
8.5 - Study Plan
Updated 2 months ago
A Study Plan is the roadmap a group follows. You build it once inside a group, decide how the activities open up, and every student in that group picks it up automatically with no assigning student by student.
This article explains how to create a Study Plan, control how activities are released, configure each activity, activate the plan, and what your students see on their side.
Who this is for
Study Plans live inside groups, which makes them especially useful for tutors. A tutor only sees the students who have been added to them through a group, so the Study Plan becomes the single place where they set the learning path for that batch.
Instead of assigning a practice test to 22 students one at a time, you add it to the group's Study Plan once and anyone enrolled in the group (now or later) follows the same sequence.
Before you begin, make sure:
The group has already been created and students are added to it (see 8.1 Creating a Group).
The practice tests, problem sets, or resources you want to include already exist in your program.
Step 1 - Open the group and go to the Study Plan tab
From the left sidebar, open your program (for example, SAT) and go to Users.
Click the group you want to work on.
The group opens on the Study plan tab - it's the first tab in the row, alongside Progress, Reports, Students, and Tutors.
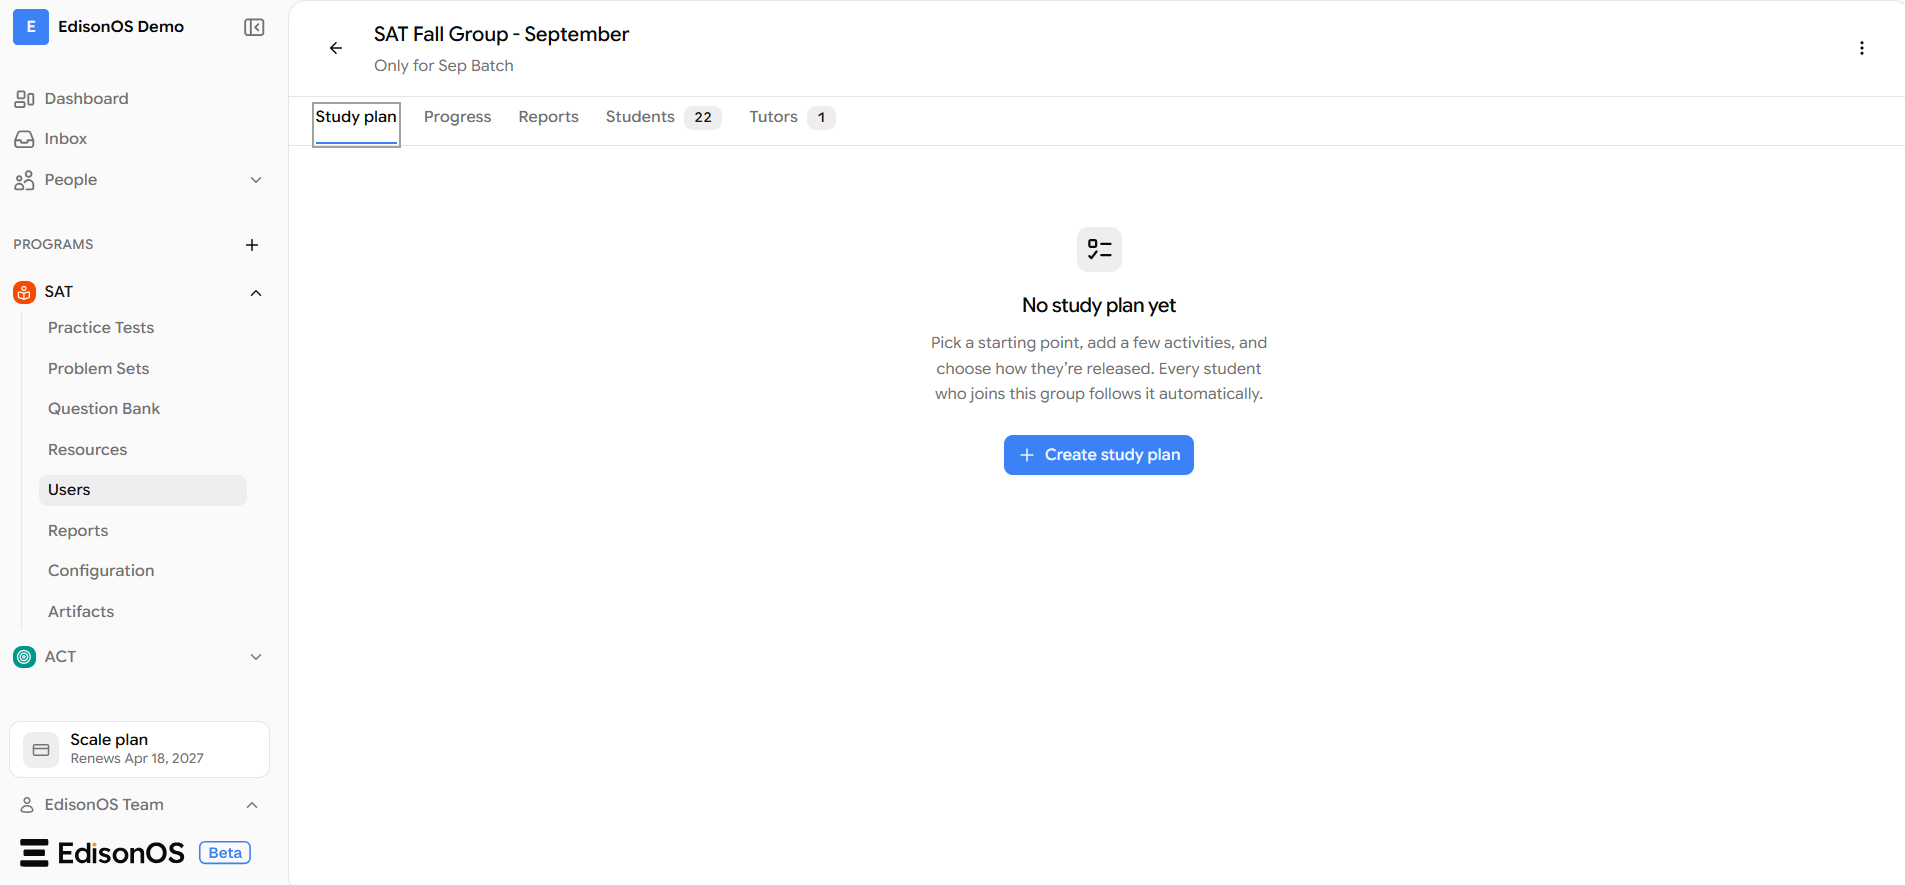
If the group doesn't have a plan yet, you'll see the No study plan yet empty state.
Click + Create study plan.
Step 2 - Pick a starting point
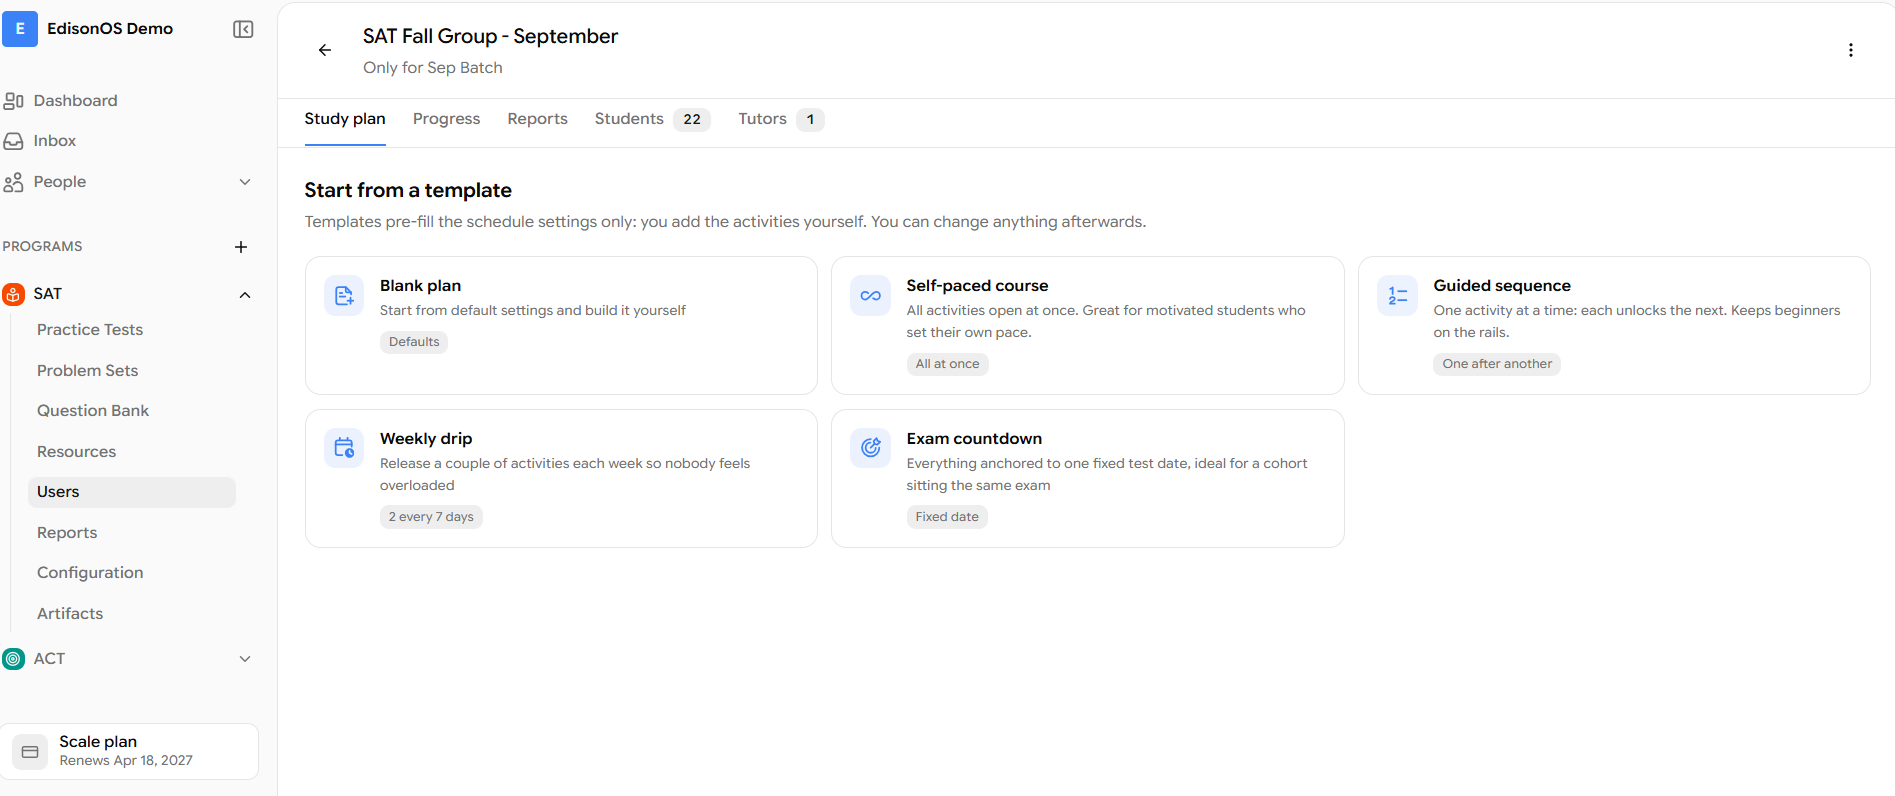
You'll land on Start from a template. Templates only pre-fill the schedule settings — you still add the activities yourself, and you can change anything afterwards.
Template | What it does | Best for |
|---|---|---|
Blank plan | Starts from default settings and you build it yourself | Full control |
Self-paced course | All activities open at once | Motivated students who set their own pace |
Guided sequence | One activity at a time; each unlocks the next | Beginners who need to stay on the rails |
Weekly drip | Releases a couple of activities every 7 days | Cohorts you don't want to overload |
Exam countdown | Everything anchored to one fixed test date | A batch sitting the same exam |
Click the template you want. For this walkthrough, we'll use Blank plan.
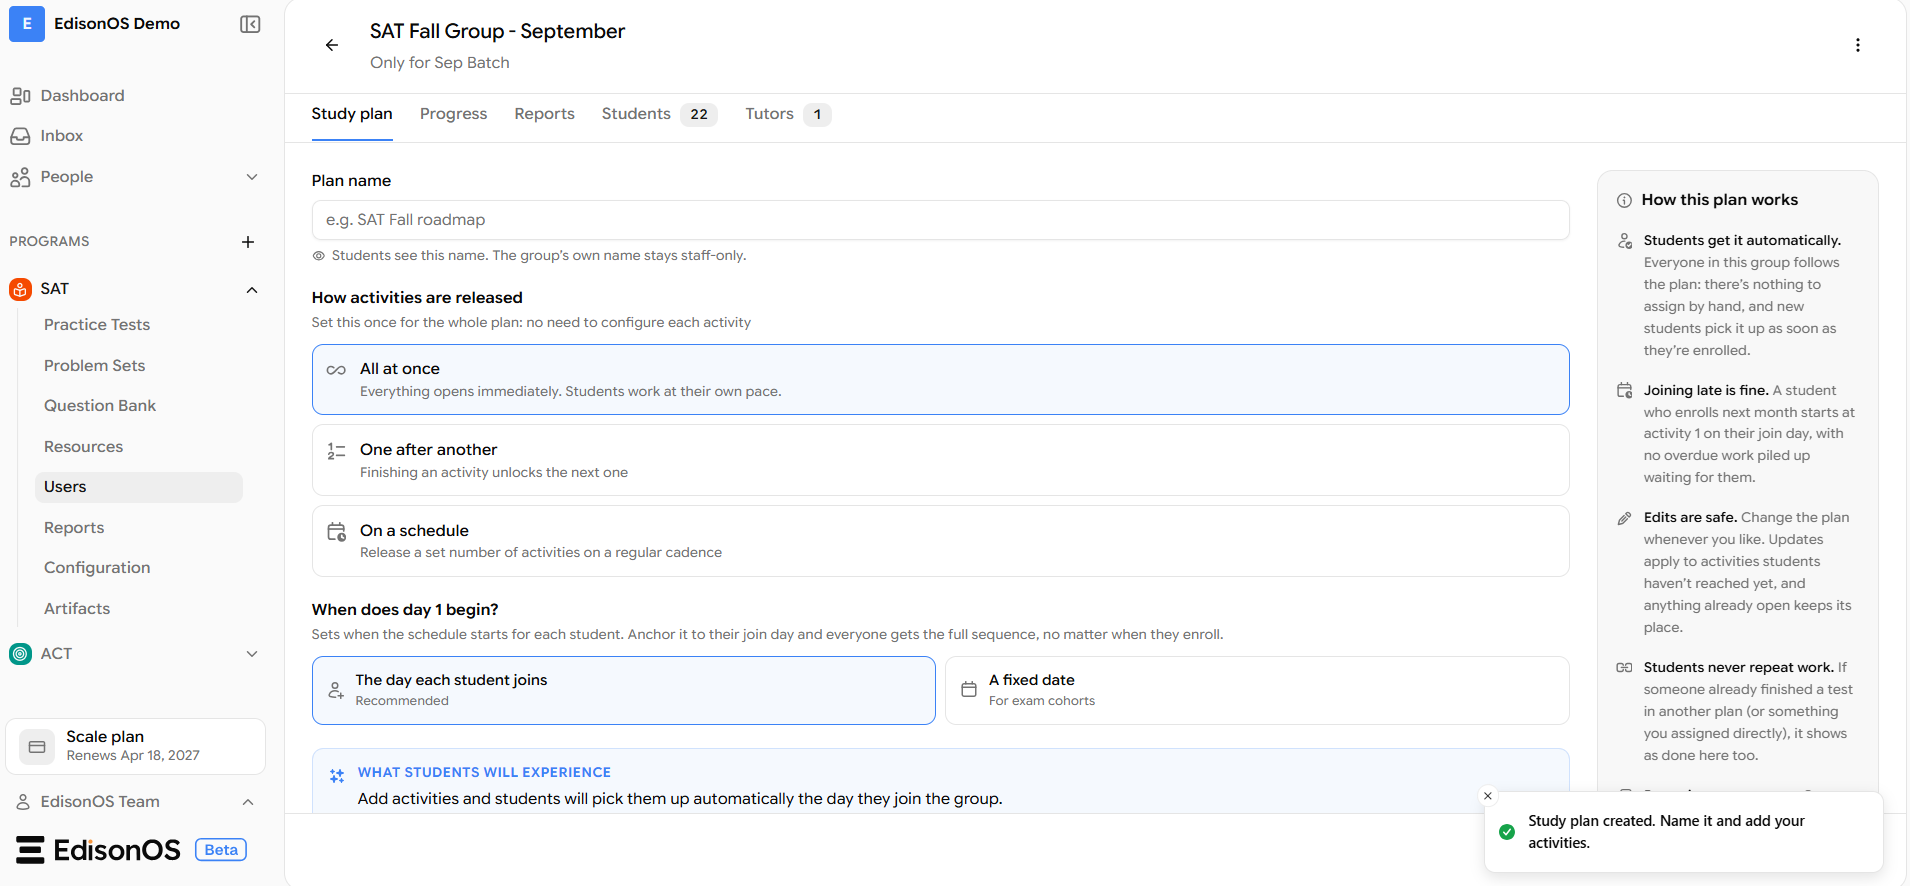
You'll see a confirmation: Study plan created. Name it and add your activities. At this point the plan exists as a draft.
Step 3 - Choose how activities are released
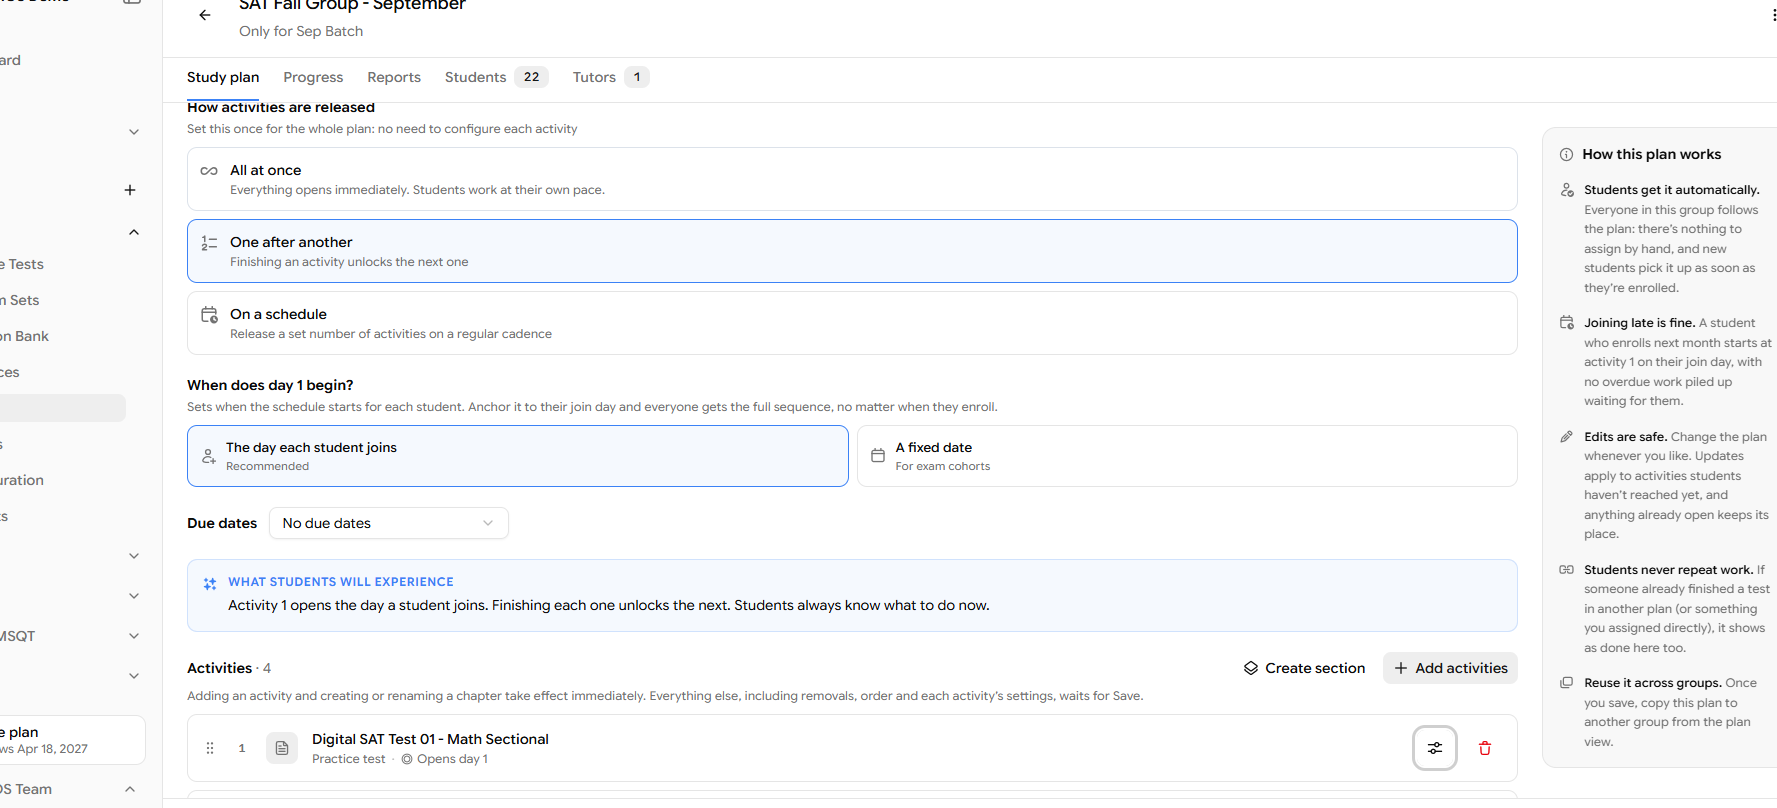
This is set once for the whole plan, so you don't have to configure each activity individually.
All at once - Everything opens immediately. Students work at their own pace.
One after another - Finishing an activity unlocks the next one.
On a schedule - Releases a set number of activities on a regular cadence.
Step 4 - Decide when Day 1 begins
This sets when the schedule starts for each student.
The day each student joins (Recommended) - Anchors the plan to each student's join date, so everyone gets the full sequence no matter when they enrol.
A fixed date - Everyone moves on the same calendar. Use this for exam cohorts.
You can also set Due dates for the plan here, or leave it on No due dates.
As you change these settings, the What students will experience box updates to describe the outcome in plain language - a quick way to sanity-check your setup before you save.
Step 5 - Add activities
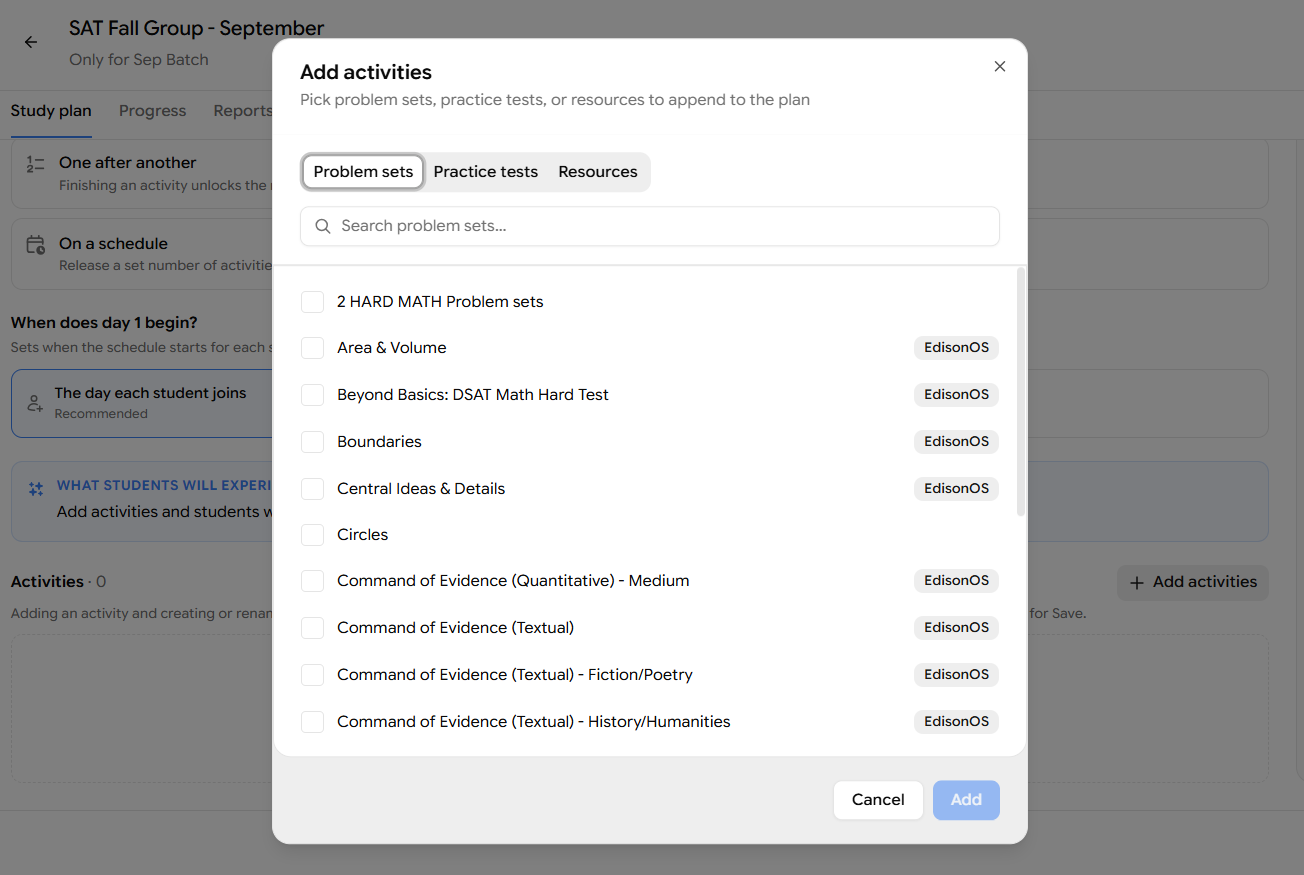
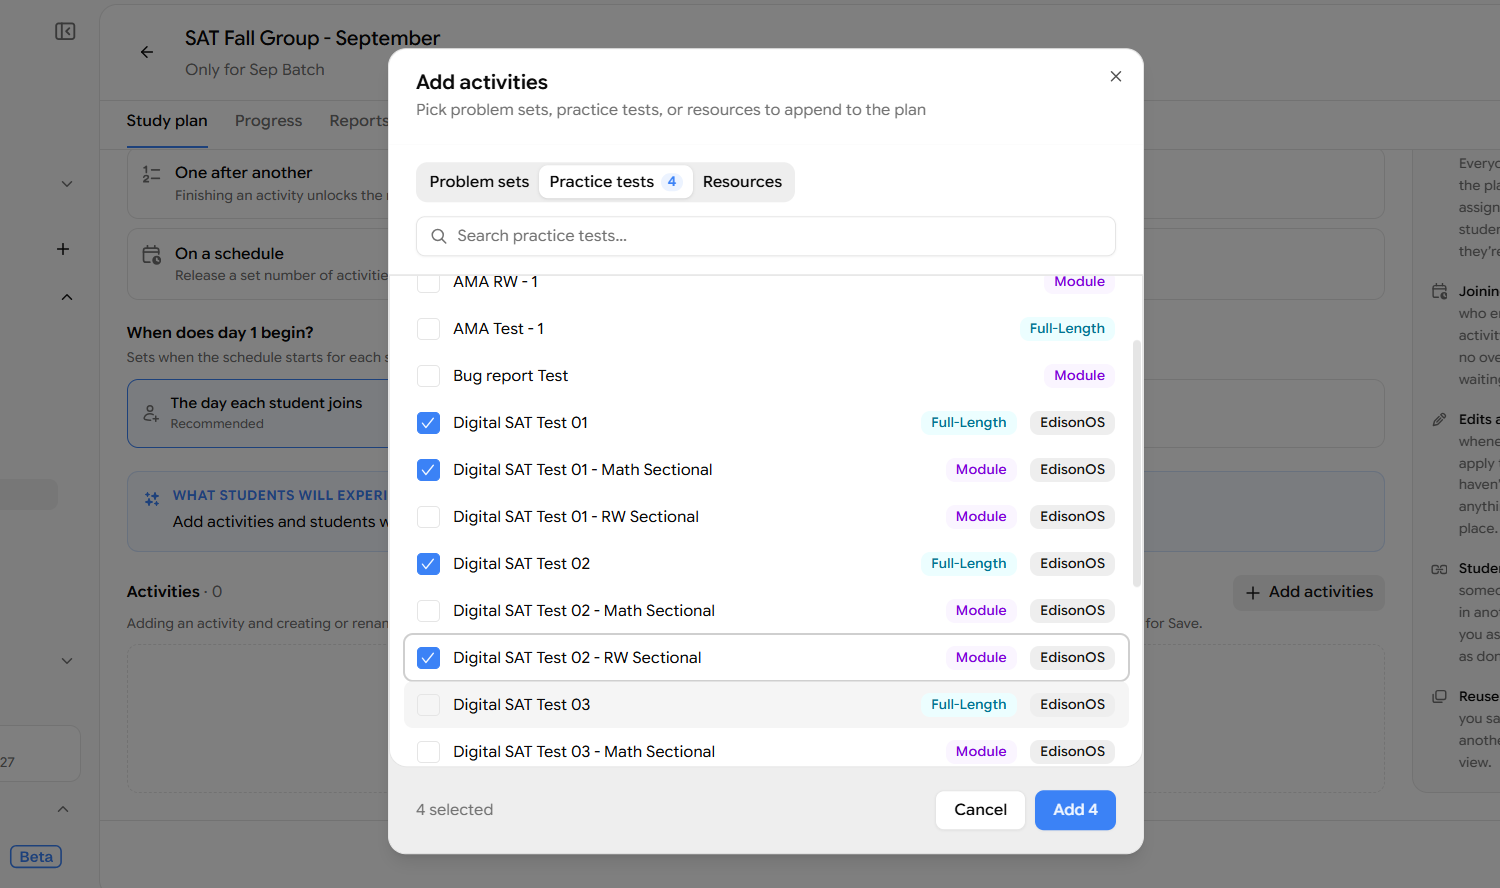
Scroll down to the Activities section and click + Add activities.
In the dialog you can switch between three tabs:
Problem sets
Practice tests
Resources
Use the search bar to find what you need, tick the checkboxes, and click Add (the button shows the count, e.g. Add 4). The items are appended to the plan in the order they appear.
Use the drag handle to the left of each activity to reorder the sequence, and Create section if you'd like to group activities into chapters (for example, Diagnostics, Math drills, Full-length mocks).
Step 6 - Configure each activity
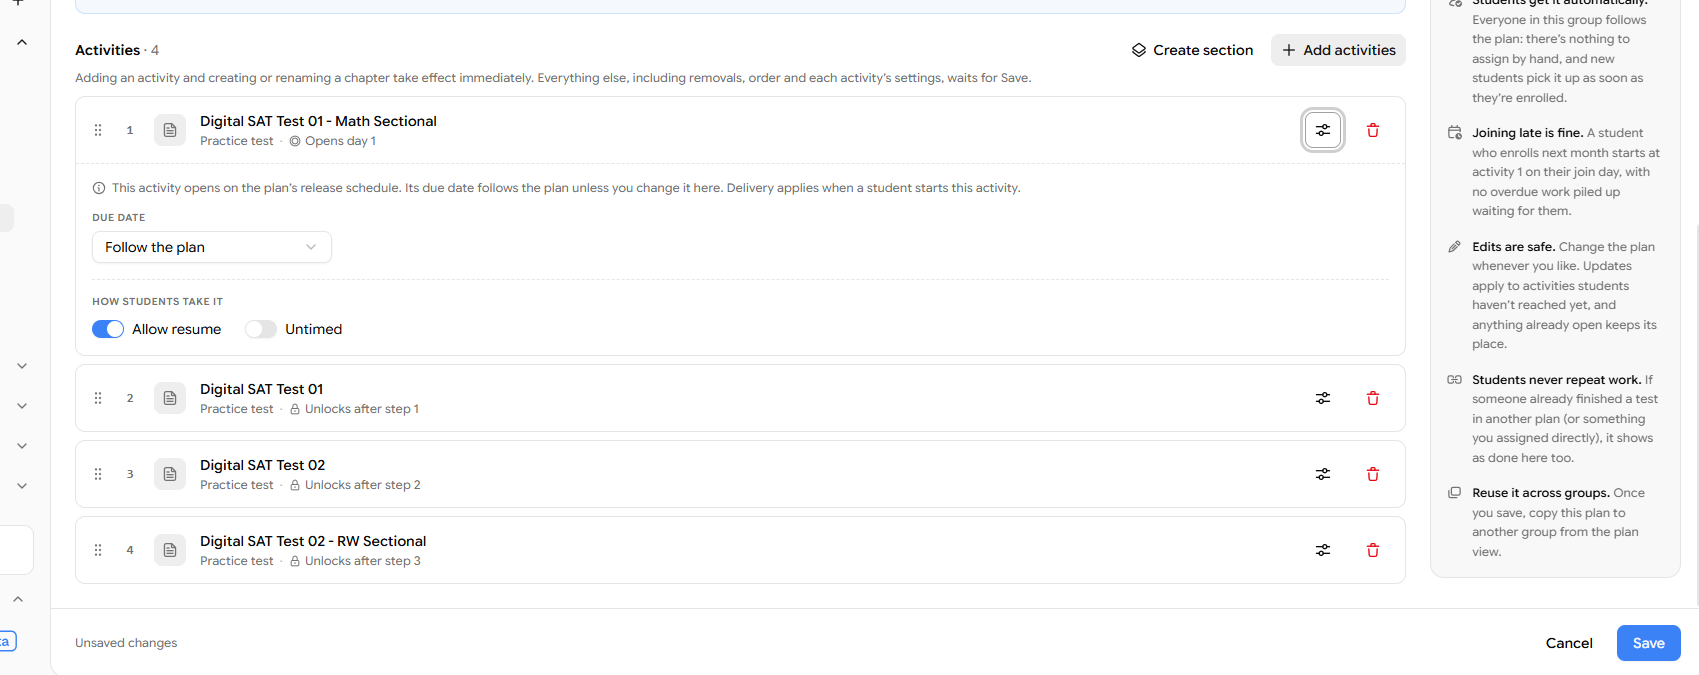
Each activity inherits the plan's release rule, you'll see labels like Opens day 1 for the first activity and Unlocks after step 1, step 2, and so on for the rest.
To fine-tune one activity, click the settings icon on its row. You can control:
Due date
Follow the plan - Uses the plan-level due date setting.
Set a deadline - Give this one activity its own deadline.
No due date for this activity - Exempt it from deadlines entirely.
How students take it
Allow resume - Lets a student pause and continue the test later.
Untimed - Removes the timer for this activity.
Step 7 - Save your changes
Adding an activity and creating or renaming a chapter take effect immediately. Everything else removals, ordering, and each activity's settings waits for Save.
While anything is pending you'll see Unsaved changes at the bottom of the page. Click Save to commit them, or Cancel to discard.
Step 8 - Name and activate the plan
After saving, you're taken to the plan view. A new plan starts as Draft, and a draft isn't visible to students yet.
You'll see a banner: This plan is a draft. Name it in the editor before activating it.
Click Edit plan.
Enter a Plan name in the field at the top - for example, September fall plan.
Students see this name. The group's own name stays staff-only, so pick something students will recognise.
Save, then click Activate plan.
Once activated, the plan is live for the group. The summary line under the plan name confirms your configuration at a glance - for example, 4 activities · one after another · from each join date.
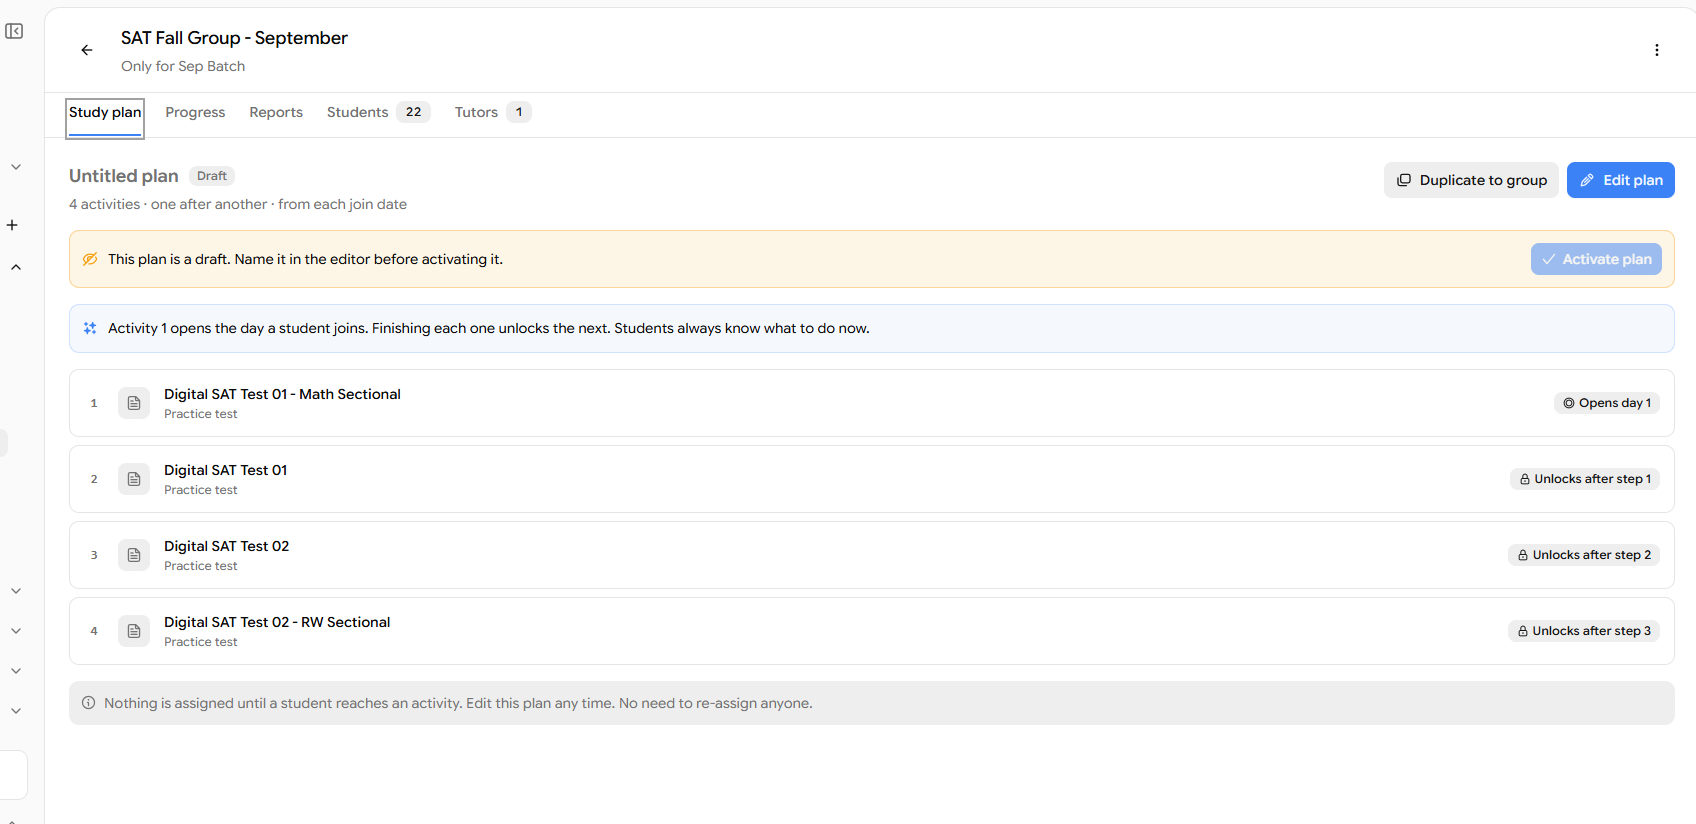
Reuse it elsewhere: Use Duplicate to group to copy a saved plan into another group instead of rebuilding it.
What students see
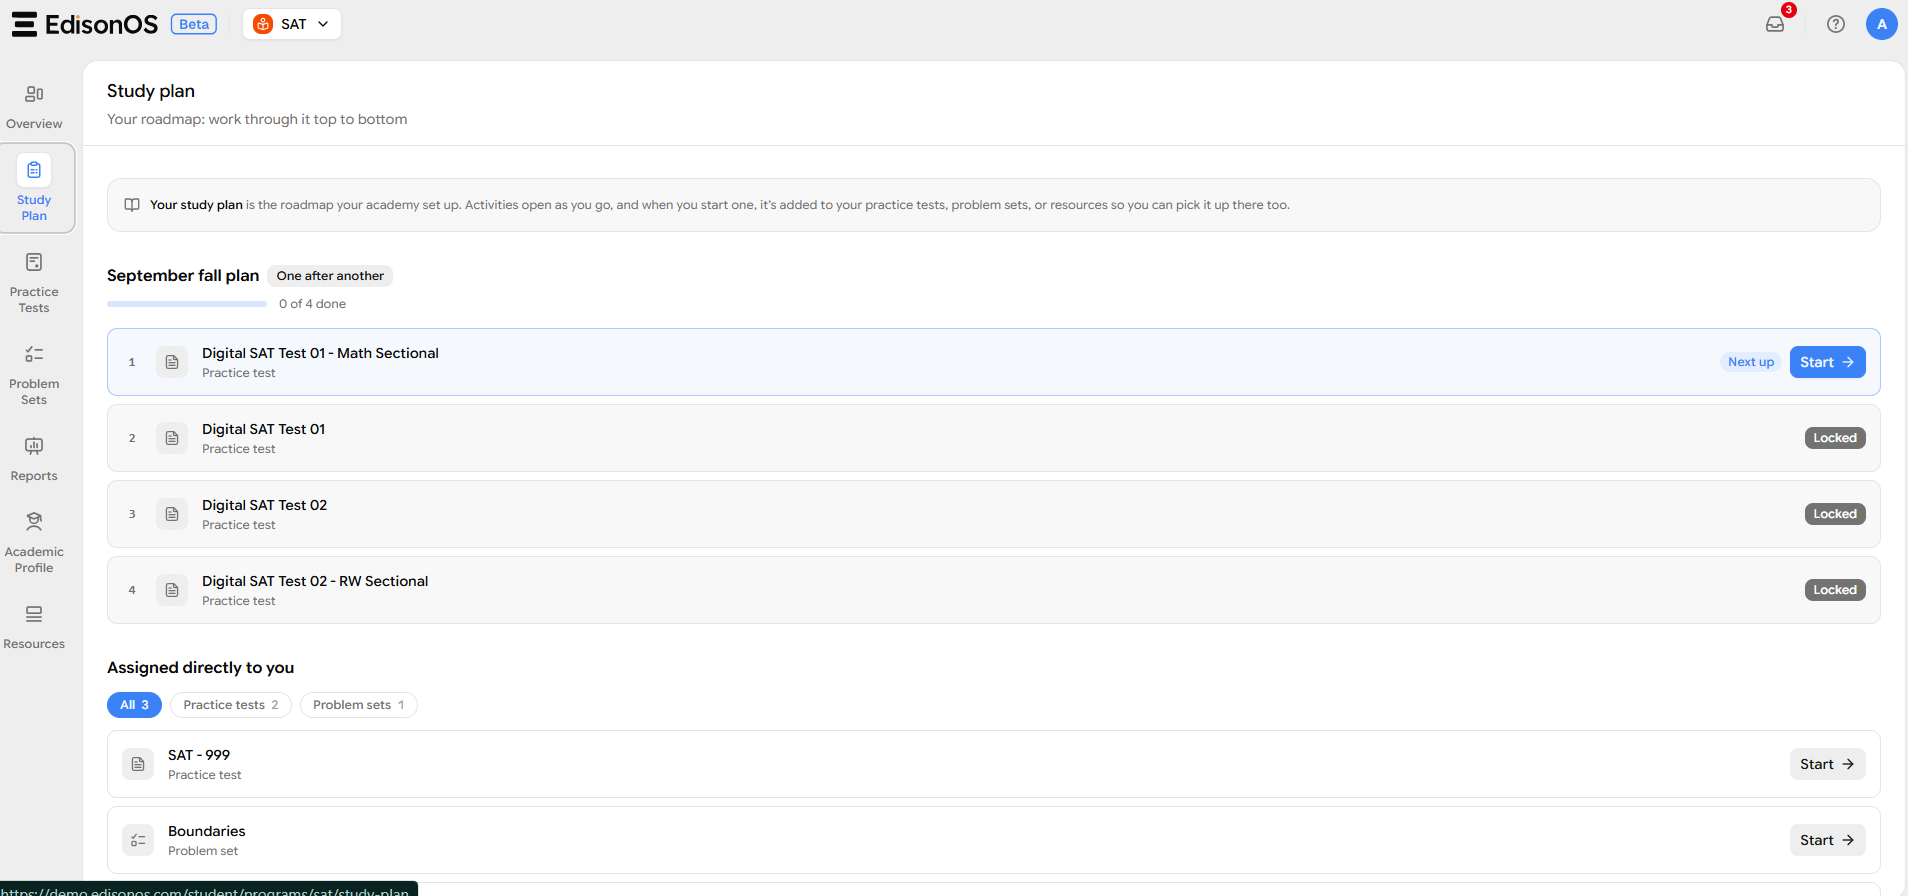
When a student logs in, they click Study Plan in the left navigation pane. There they'll find:
The plan name and its release mode (e.g. One after another).
A progress bar showing how far along they are (0 of 4 done).
The ordered list of activities.
How they move through it depends entirely on the release rule you chose:
With One after another, only the current activity is available - marked Next up with a Start button - while the rest show as Locked until the one before it is completed.
With All at once, every activity is open and the student can take them in any order.
Below the plan, an Assigned directly to you section lists anything assigned to that student individually, outside the group plan, filterable by practice tests and problem sets.
Frequently asked questions
Can a group have more than one Study Plan? No, we have have only one study plan per group.
Will my draft plan show up for students? No. A plan is only visible to students once you've named it and clicked Activate plan.
Can I mix practice tests, problem sets, and resources in one plan? Yes. All three types can be added from the Add activities dialog and sequenced together.
What happens if I delete an activity from the plan? Removals are held until you click Save. Students who have already completed that activity keep their results in Reports.