5.5 Assign a test
Overview
Once your practice test is built, configured, and previewed, the final step is getting it into your students' hands. EdisonOS gives you a clean, two-step assignment flow where you can control attempt limits, access windows, resume permissions, timer settings, and review visibility all before deciding exactly who receives the test.
You can assign any tests from My Library that has been published (your own tests) or directly from the EdisonOS Library (pre-built, ready-to-use tests)
Method 1 - Assign to students Individually
Step 1 - Find the Test and Click Assign
Navigate to your program (e.g., SAT) in the left sidebar and click on Practice Tests. Use the library switcher at the top to choose either My Library or EdisonOS Library depending on which test you want to assign.
Each test card displays its type Module Test or Full-Length Test and has two action buttons at the bottom: Assign and Preview.
Click Assign on the test you want to distribute.
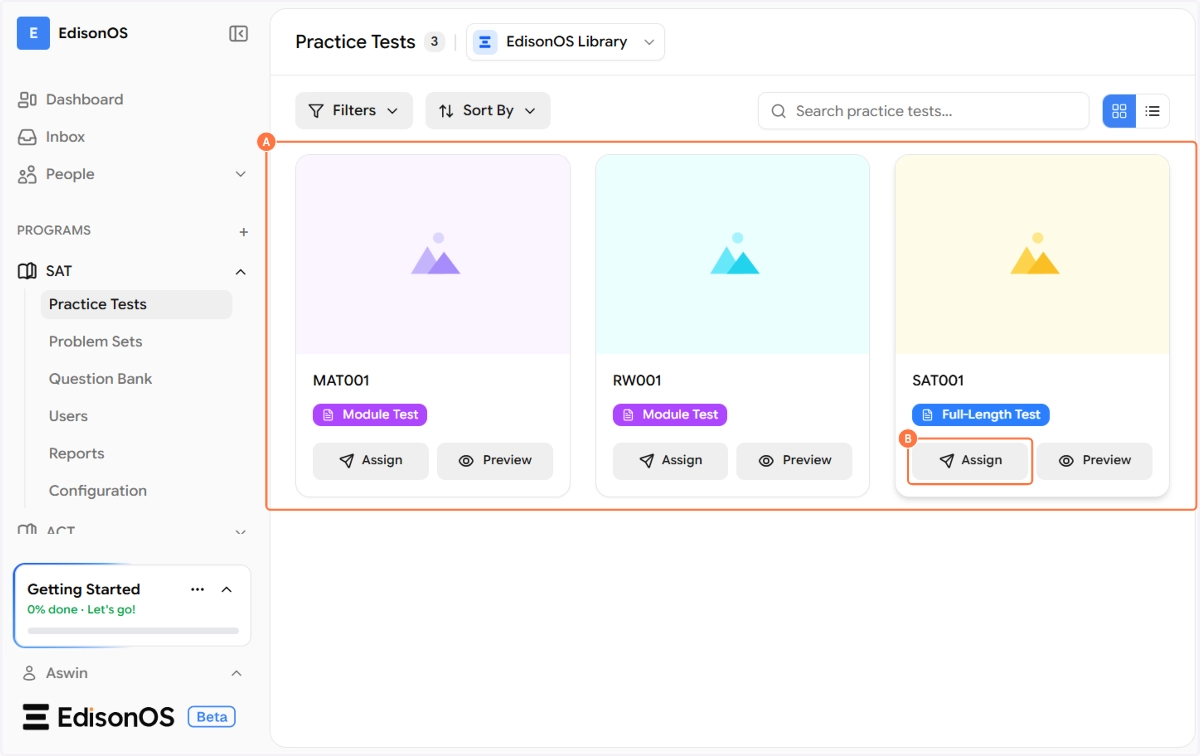
Not sure if the test is ready for students? Use the Preview button first to walk through the full student experience before assigning. This helps you catch any issues before they reach your students.
The Assign Practice Test modal opens. It is a two-step flow which is Step 1 covers settings, Step 2 covers student selection. The progress indicator at the bottom (1 of 2) keeps you oriented throughout.
Step 2 – Schedule & Attempts
The first step of the assignment modal is titled Assign Practice Test and shows the test name (e.g., SAT001) at the top. This is where you configure when and how many times students can take the test.
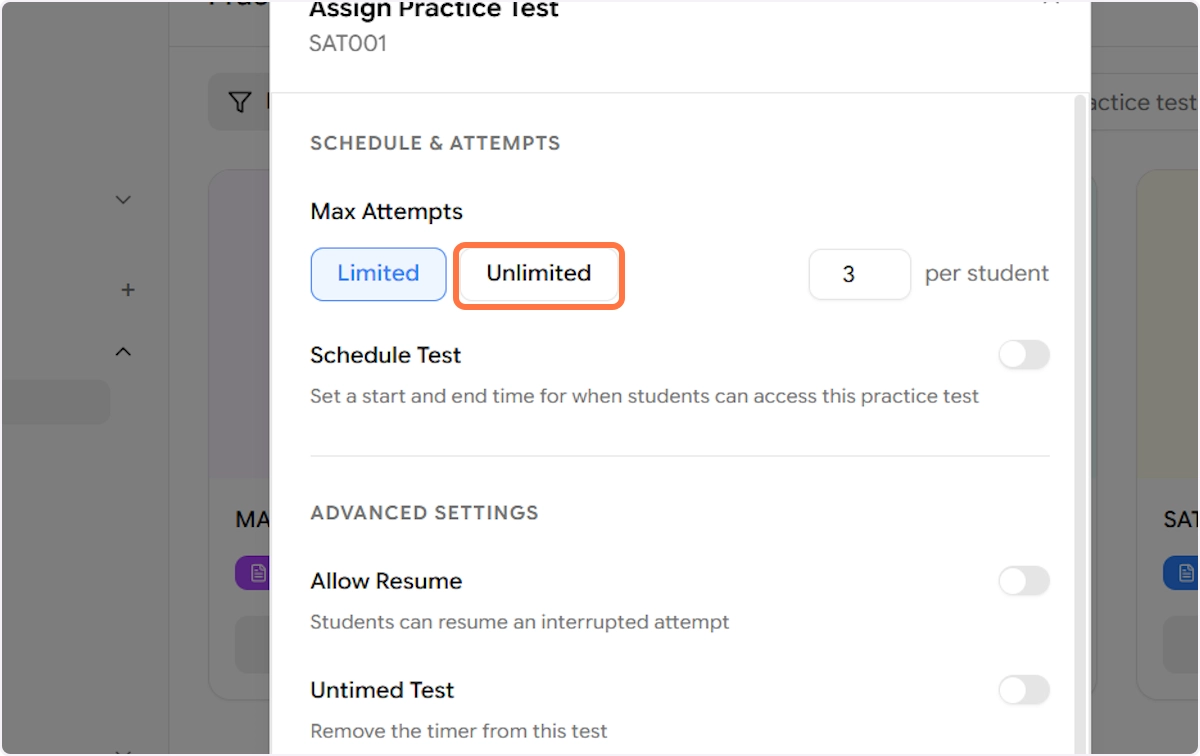
Max Attempts
Choose how many times each student is allowed to attempt this test:
Limited When selected, you set a specific number in the field to the right (e.g., 3 per student). This means each student can take the test up to 3 times. After exhausting their attempts, they will no longer be able to access the test. This is the recommended setting for controlled assessment environments where you want to prevent unlimited retakes.
Unlimited When selected, students can take the test as many times as they want with no cap. This works well for open practice scenarios where students are self-studying and you want them to revisit the test at their own pace without restrictions.
For diagnostic tests assigned at the start of a program, set attempts to 1 to get a clean, uninfluenced baseline. For revision tests closer to exam day, Unlimited lets students practice as much as they need.
Schedule Test
The Schedule Test toggle is off by default, meaning the test is immediately accessible to assigned students from the moment of assignment.
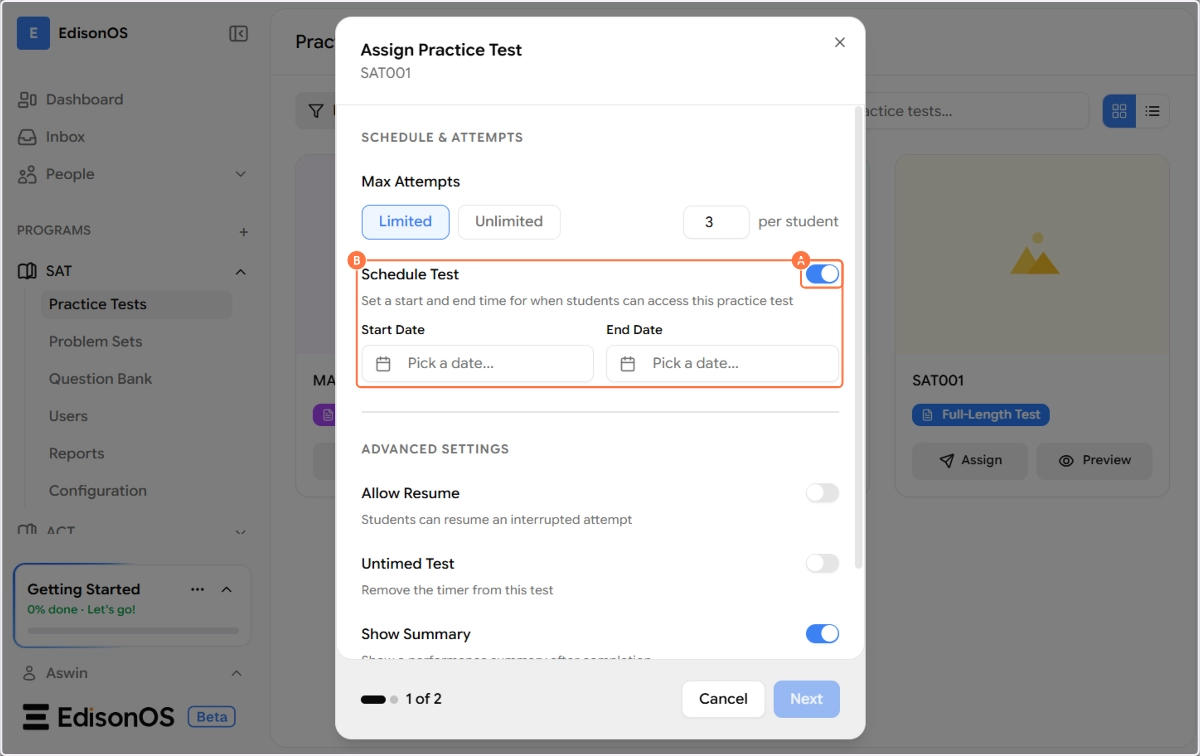
Toggle it on to set a specific access window. When enabled, two date picker fields appear:
Start Date - The earliest date and time students can open and begin the test. Before this date & time, the test will appear in their list but cannot be started.
End Date - The deadline by which students must complete their attempt. After this date & time, the test will no longer be accessible regardless of remaining attempts.
Always set an End Date when assigning tests as part of a structured program or curriculum cycle. This creates healthy urgency for students and keeps your progress tracking clean. For unscheduled open practice, leave the Schedule toggle off.
Step 3 - Advanced Settings
Below the Schedule section, the Advanced Settings group gives you fine-grained control over the student experience during and after the test.
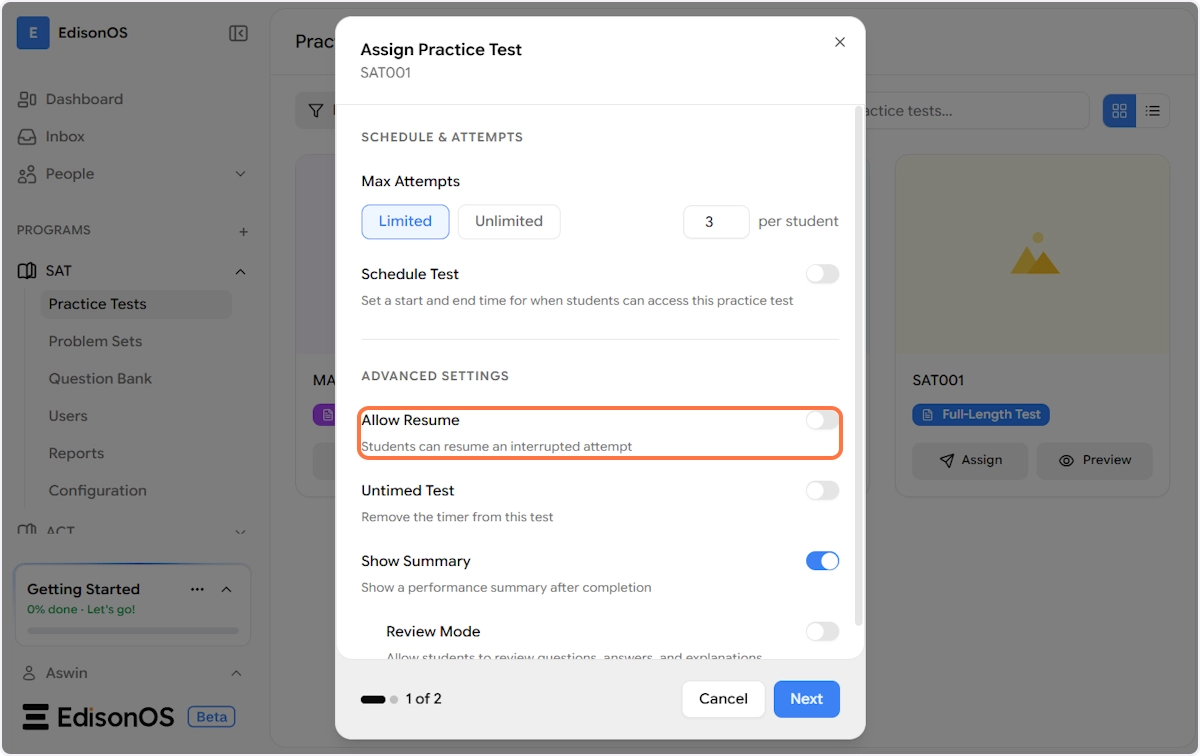
Allow Resume When enabled, students who exit the test mid-attempt either intentionally via Save and Exit, or due to a disconnection or technical issue can return and pick up exactly where they left off. Their answers, flagged questions, and remaining timer are all preserved.
When disabled, any interrupted attempt is treated as a completed attempt and cannot be resumed. The student would need to start a fresh attempt (if they have remaining attempts available).
Enable Allow Resume for full-length tests where a student may need a break or could face a connection drop. For proctored, controlled exam simulations, keep it disabled to replicate real exam conditions where exits are not permitted.
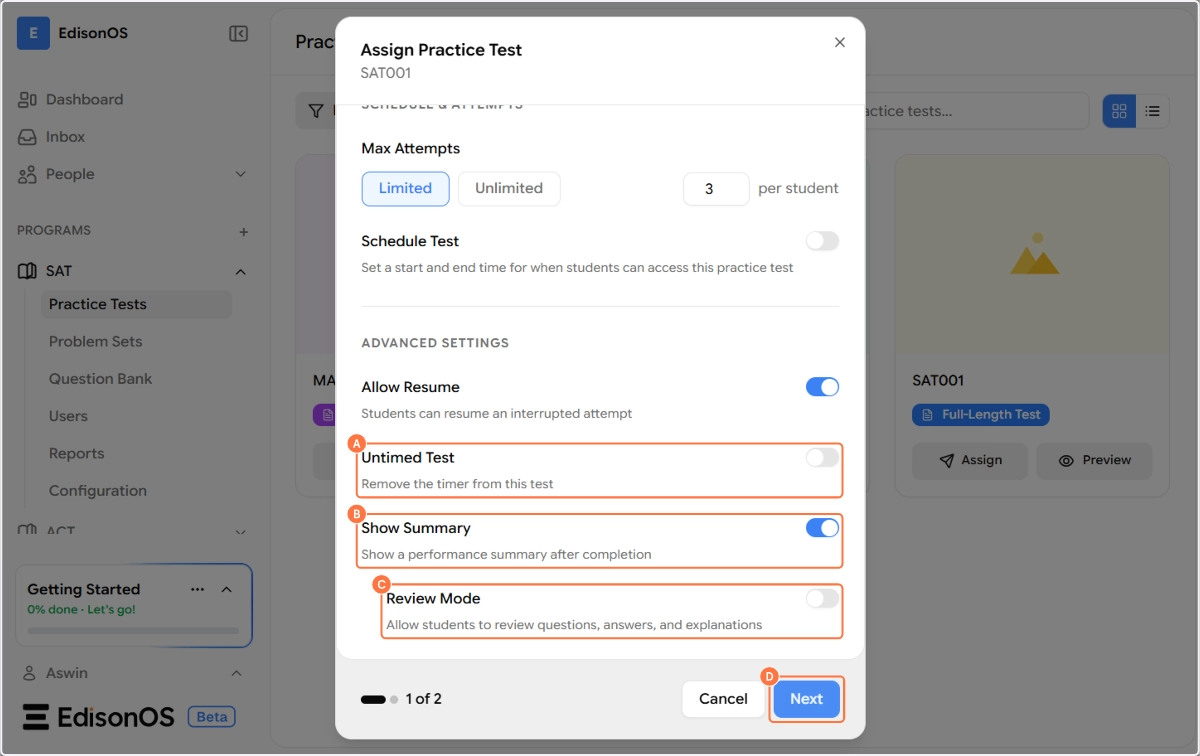
Untimed Test When enabled, the countdown timer is completely removed from this test for the assigned students. Students can take as long as they need without any time pressure. This is useful for students with documented accommodations, those who are new to the content and need extra time to build confidence, or for low-stakes exploratory sessions.
When disabled (default), the timer configured in the section settings applies and counts down normally during the test.
Show Summary When enabled (By default its toggled on), students see a performance summary screen immediately after submitting the test. This shows their score, accuracy, time spent, and a breakdown of correct, incorrect, skipped, and missed questions giving them instant feedback on how they did.
When disabled, students are taken directly out of the test after submission without seeing any summary. This can be useful when you want to control when and how feedback is delivered — for example, if you plan to review results as a class before releasing individual scores.
Keep Show Summary on for self-paced practice tests. Turn it off when using the test as a formal assessment and you want to review results together during a tutoring session before the student sees their own scores.
Review Mode When enabled, students can go back into the test after submission and review all questions alongside the correct answers and explanations. This transforms the test into a learning tool not just an assessment and is especially valuable for students who want to understand what they got wrong and why.
When disabled, students cannot access the test questions post-submission. Their results are reflected in reports, but the actual questions and answers remain locked. Use this for tests you plan to reuse across multiple cohorts, where question exposure needs to be controlled.
For first-time diagnostic tests, keep Review Mode off you may want to reassign the same test later without students having seen the answers. Once a test has served its diagnostic purpose, you can enable Review Mode so students can learn from their mistakes.
Once all settings are configured, click Next to proceed to student selection.
Step 4 - Select Students & Assign
The second step of the modal is Select Students. This is where you choose exactly who receives this assignment.
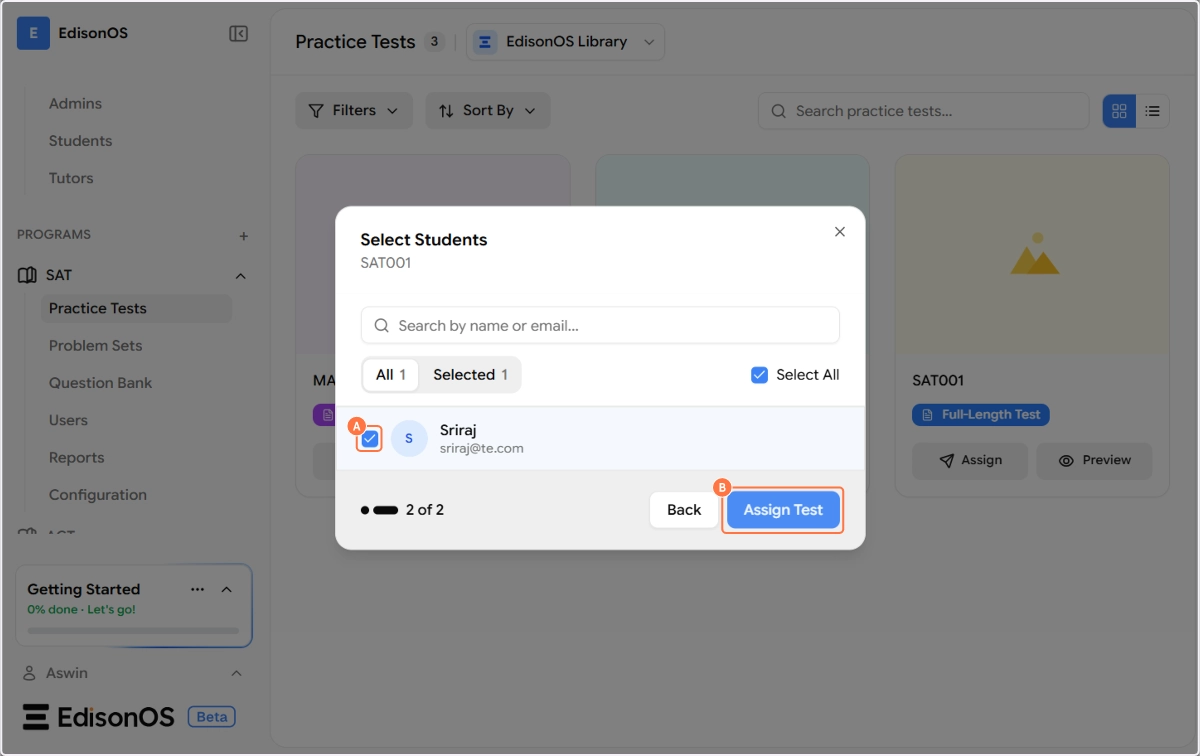
The student selection screen shows:
A search bar to find students by name or email address especially useful in larger cohorts
All and Selected tabs showing the total number of students and how many you've currently selected
A Select All checkbox to assign to your entire student list in one click
Individual student rows with a checkbox, profile icon, name, and email
Simply check the box next to each student you want to assign the test to. You can select one student, a group, or everyone at once.
If you attempt to assign the same test to a student again, an error message will appear indicating that the test has already been assigned to that student.
Once your selection is made, the Assign Test button becomes active. Click it to confirm the assignment.
Assignment Confirmed 🎉
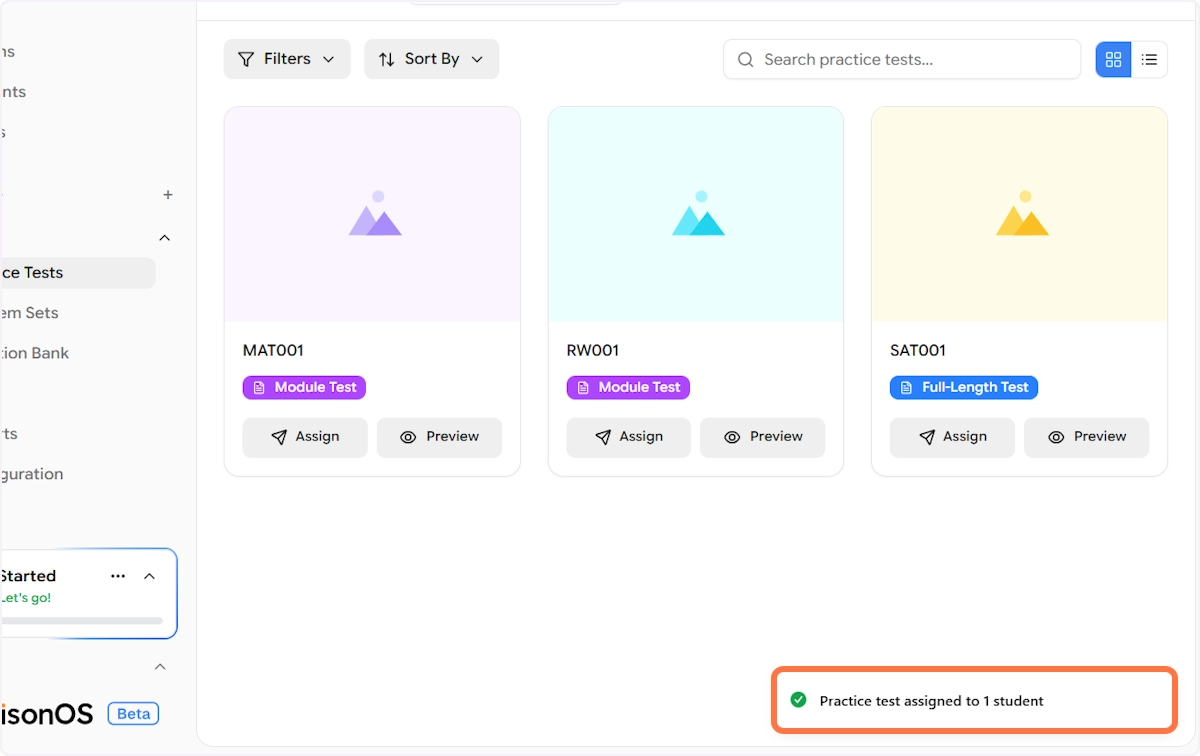
A success notification appears at the bottom of the screen: "Practice test assigned to 1 student" confirming that the test has been sent out.
From this point, assigned students will see the practice test in their student portal and can begin their attempt based on the schedule and settings you configured. All attempts, scores, and progress will be visible to you in the Reports section of the program.
Now that your test is assigned, the next article will walk you through the student test-taking experience.
Method 2 - Assign via Invitation Link
So far we covered Assign to Students Individually, where you pick specific students from your enrolled list. EdisonOS also supports a second, faster way to distribute a test: Assign via Invitation Link.
This method generates a shareable link that anyone can use to attempt the test, even if they aren't enrolled in your platform yet. It's the quickest way to get a test in front of leads, website visitors, or one-off users without going through your full enrollment flow.
When to use the Invitation Link method
Invitation links are designed for bulk distribution and open access scenarios. Common use cases include:
Embedding a free practice test on your website to capture leads.
Sharing a quick diagnostic test with prospects who haven't enrolled yet.
Sending a one-off test to someone who isn't part of your regular cohort.
Running a public mock test campaign or webinar follow-up.
Any custom use case where you want a single link that anyone can open and attempt.
Because anyone with the link can attempt the test, treat it as a public distribution channel rather than a controlled assignment.
Step 1 - Click Assign and choose the link type
From your program, navigate to Practice Tests (or Problem Sets) and click Assign on the test you want to distribute, just like in Method 1.
The Choose Test Link Type modal will open with two options:
Assign to Students Individually - Assigns the test to students already enrolled in your platform (covered in Method 1).
Assign via Invitation Link - Generates a shareable link for bulk distribution. Anyone with the link can attempt the test.
Click Assign via Invitation link to proceed.
Step 2 - Set up Link Details
The Link Details panel is where you name the link and define its accessibility window.
Link Name - Give your link a clear, recognizable name (for example, diagnostictest, website-free-mock, or summer-campaign-2026). This helps you identify the link later when you have multiple invitation links running in parallel.
Link active from The date and time the link starts working. Before this moment, the link won't open the test.
Link active till The date and time the link stops working. After this moment, anyone clicking the link will see that it's no longer active.
A small but important distinction: the active-from and active-till dates only control when the link itself is active or inactive. They don't control the schedule of the test attempt itself. Test scheduling (when a student can actually start the test) is handled separately under Advanced Settings.
Use a clear naming convention if you plan to run multiple invitation links for example, prefix them by source (web-, lead-, event-) so you can quickly tell which link drove which attempts when you review reports later.
Step 3 - Configure Advanced Settings
The Advanced Settings section gives you full control over how the test behaves for anyone who attempts it via this link.
Defaults are pre-configured for most use cases, so you only need to adjust these if you want custom behaviour for this specific link.
After the Test
Redirection Decide where students land after they submit the test. Pick the option that fits the goal of your link:
Summary Page (default) - Shows a full performance summary with score, accuracy, time spent, and a breakdown of correct/incorrect/skipped questions. Best for self-paced practice where instant feedback is the value.
Locked Summary - Shows that a summary exists but keeps the details hidden until you (the admin) unlock it. Useful when you want to deliver the score in a follow-up tutoring session.
Thank You Page - A simple acknowledgement screen. Good for lead-capture flows where the score isn't the main goal, the conversation afterward is.
Custom URL - Redirects students to a URL you specify. This is powerful for marketing flows: send them to a "Book a Free Consultation" page, your pricing page, or a tailored landing page.
Dashboard - Sends students to their EdisonOS dashboard. Best when the link is being used by enrolled or soon-to-be-enrolled students who'll continue using the platform.
For a website lead-capture funnel, the Custom URL redirection paired with a tailored landing page (e.g., "Your test is in! Book a free 1:1 to walk through your score.") is one of the highest-converting setups.
Student Details
This section lets you decide what information to collect from each person who opens the link. Toggle on the fields you need.
Basic details:
Student name (currently mandatory)
Student Email (currently mandatory)
School Name
Grade
Gender
Race
Hispanic Ethnicity
Language Spoken
Parent email
Note: Student name and Student Email are currently mandatory and cannot be made optional. The "Optional" toggle for these fields will be enabled in an upcoming release.
Academic goals:
Baseline Score
Target Score
Target Test Date
Target School
Only collect what you genuinely plan to use. Every additional field adds friction at the start of the test and can lower completion rates. For a top-of-funnel free practice test, name and email are usually enough; layer in academic goals only when the data actually feeds into your sales or onboarding conversation.
Step 4 - Generate the Link
Once all settings are configured, click Generate Link at the bottom of the panel.
EdisonOS will create your shareable invitation link, which you can then:
Embed on your website as a "Take a Free Practice Test" button.
Share with leads over email, WhatsApp, or your CRM workflows.
Drop into a webinar follow-up or a marketing campaign.
Send to anyone who needs to take a quick test without enrolling first.
Anyone who opens the link will go through the details you configured, take the test under the settings you chose, and land on the redirection page you selected. Their attempt and score will show up in your Reports just like any enrolled student's attempt so you keep full visibility into how your invitation links are performing.
Method 1 vs Method 2 - quick comparison
Assign to Students Individually | Assign via Invitation Link | |
|---|---|---|
Best for | Enrolled students in a structured program | Bulk distribution, leads, free tests without enrollment, one-off users |
Who can take it | Only specific students you select | Anyone with the link |
Setup speed | Two-step flow with student selection | Generate one link and share |
Use case examples | Cohort assignments, scheduled coursework, diagnostic tests for enrolled students | Website free tests, lead magnets, public mocks, quick share with non-enrolled users |
Visibility in Reports | Attempts tied to the enrolled student profile | Attempts tied to the profile created when the user filled in the details on the link |
Pick Method 1 when you know exactly who should take the test. Pick Method 2 when you want a frictionless, shareable test link that captures leads or serves a wider audience.
Now that you've assigned your test through either method, the next article walks you through the student test-taking experience.