1.5.8 Explore the console
Follow this walkthrough to understand the Console’s key functions.
What is the Console?
The Console is a separate application from your Academy app. It is designed for academy owners and administrators who need to manage multiple academies, subscriptions, and billing all from one place. Every EdisonOS account has access to the Console, and most users will have first set up their academy from here before entering the Academy app for the first time.
From the Console, you can:
Create and manage one or more academies
Monitor and manage your subscription plan
Track credit consumption across programs and students
Purchase additional credits or student licenses
Handle billing, invoices, and payment details
Accessing the Console from the Academy App
You don't need to navigate to a separate URL to reach the Console. If you're already inside your Academy app, you can jump to the Console in just a few clicks.
Look at the bottom-left corner of the sidebar inside your Academy app and click your profile name.
A small menu will pop up with several options: Help & Resources, Profile Settings, Academy Settings, and Sign Out. Click Academy Settings.
In Academy Settings, open the Billing tab from the left-hand menu.
Under Current plan, click Manage in Console to be taken directly to the Console app.
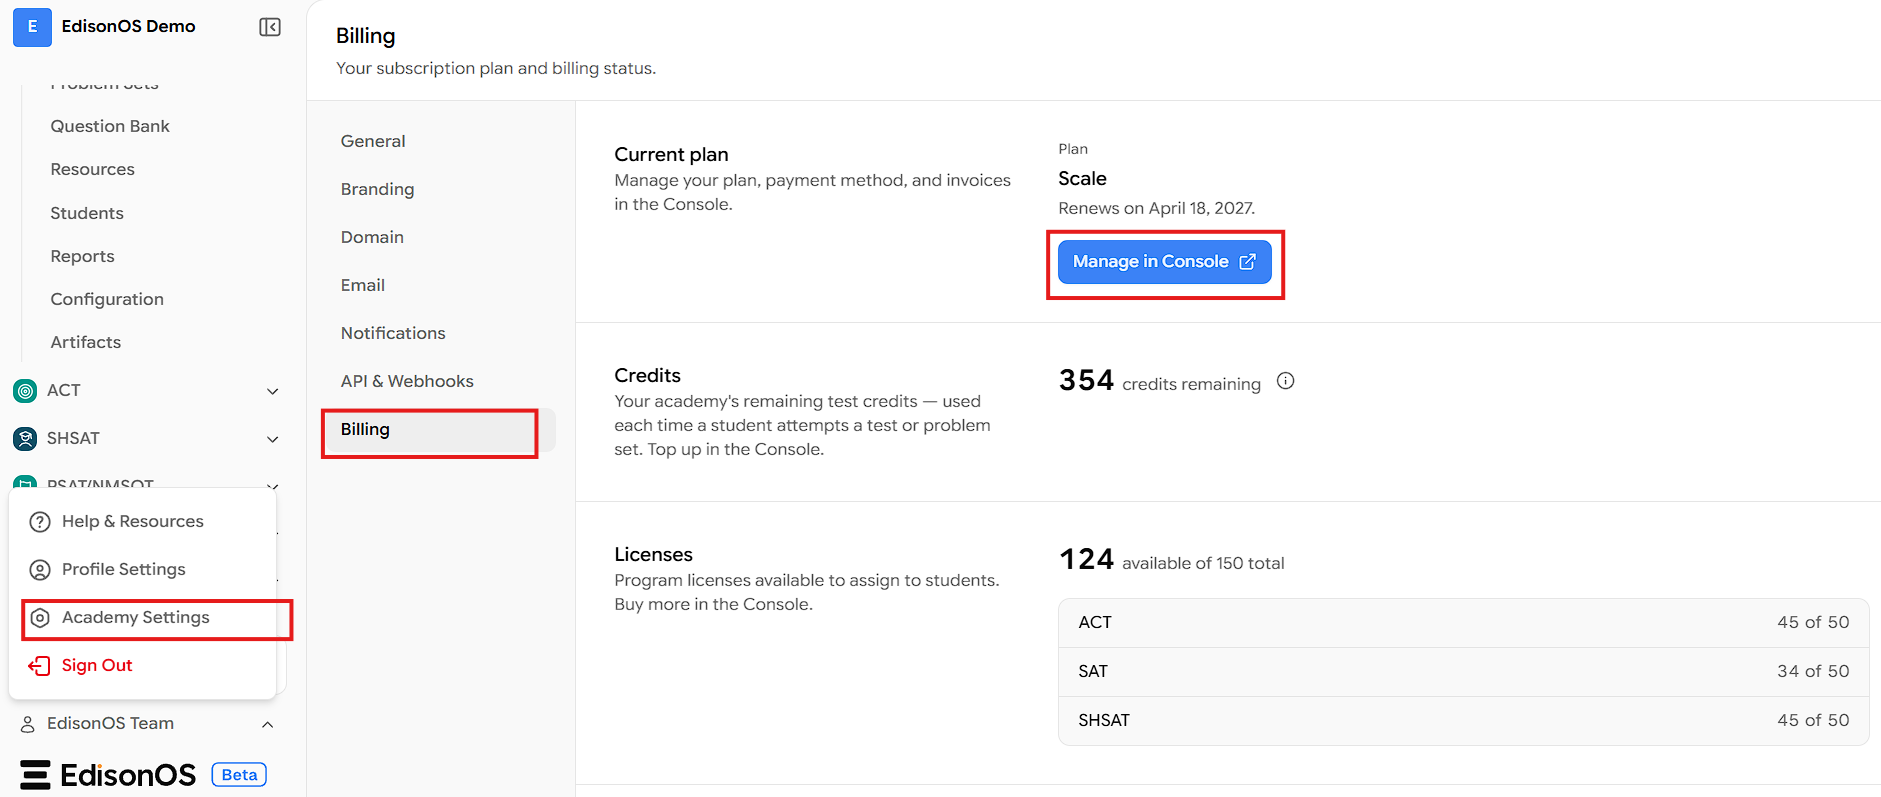
This menu is available at any time from within the Academy app. You do not need to log out or visit a separate link to access the Console.
Dashboard - Managing Your Academies
When you arrive in the Console, the first screen you'll see is the Dashboard. This is where all your academies are listed, and where you can create new ones.
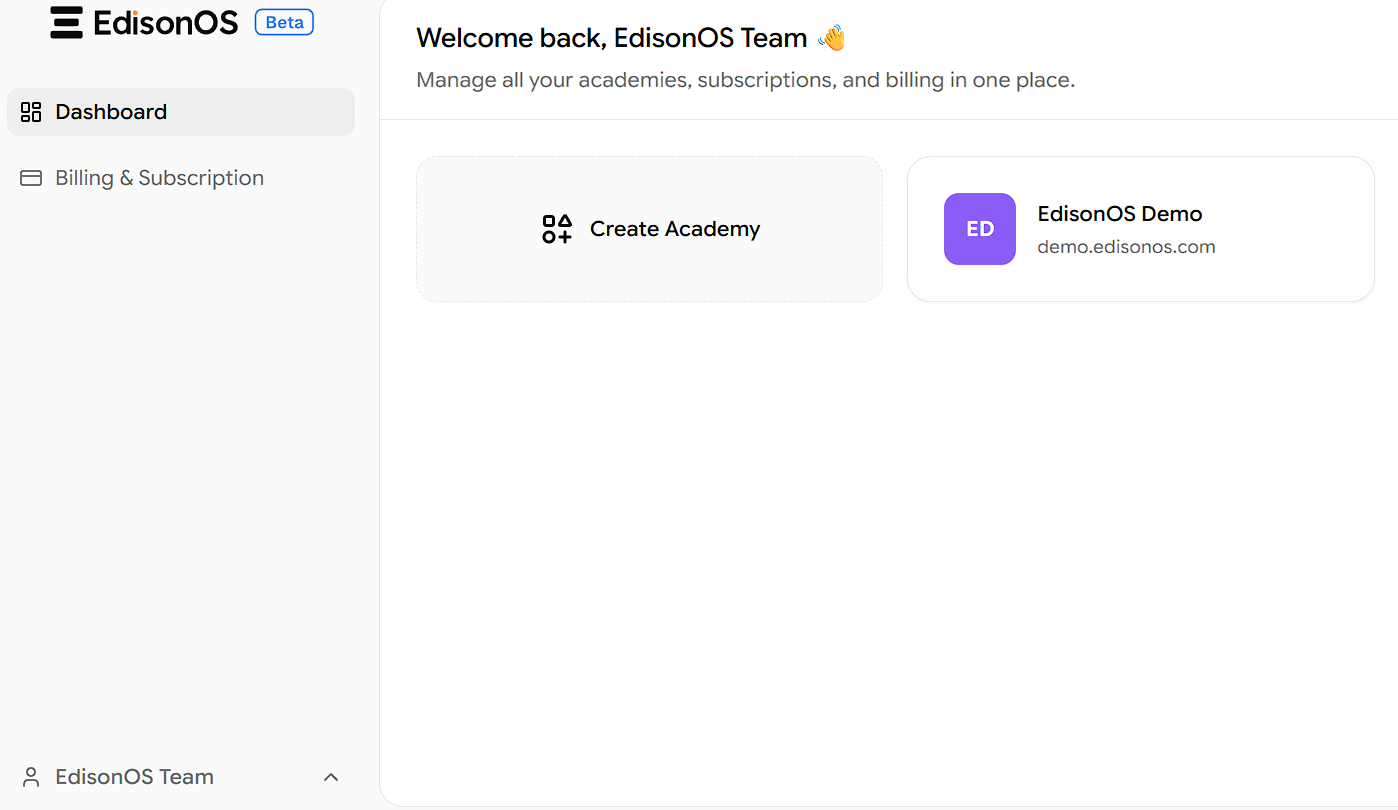
What you can do on the Dashboard
View all your academies — Each academy appears as a card showing its name and domain URL.
Create a new academy — Click the Create Academy card to set up a brand-new academy. This is the same flow most users go through when they first sign up for EdisonOS.
Billing & Subscription - Overview
The Billing & Subscription section is accessible from the left sidebar of the Console. This is where you manage plans, billing, and subscriptions for your academies in one place.
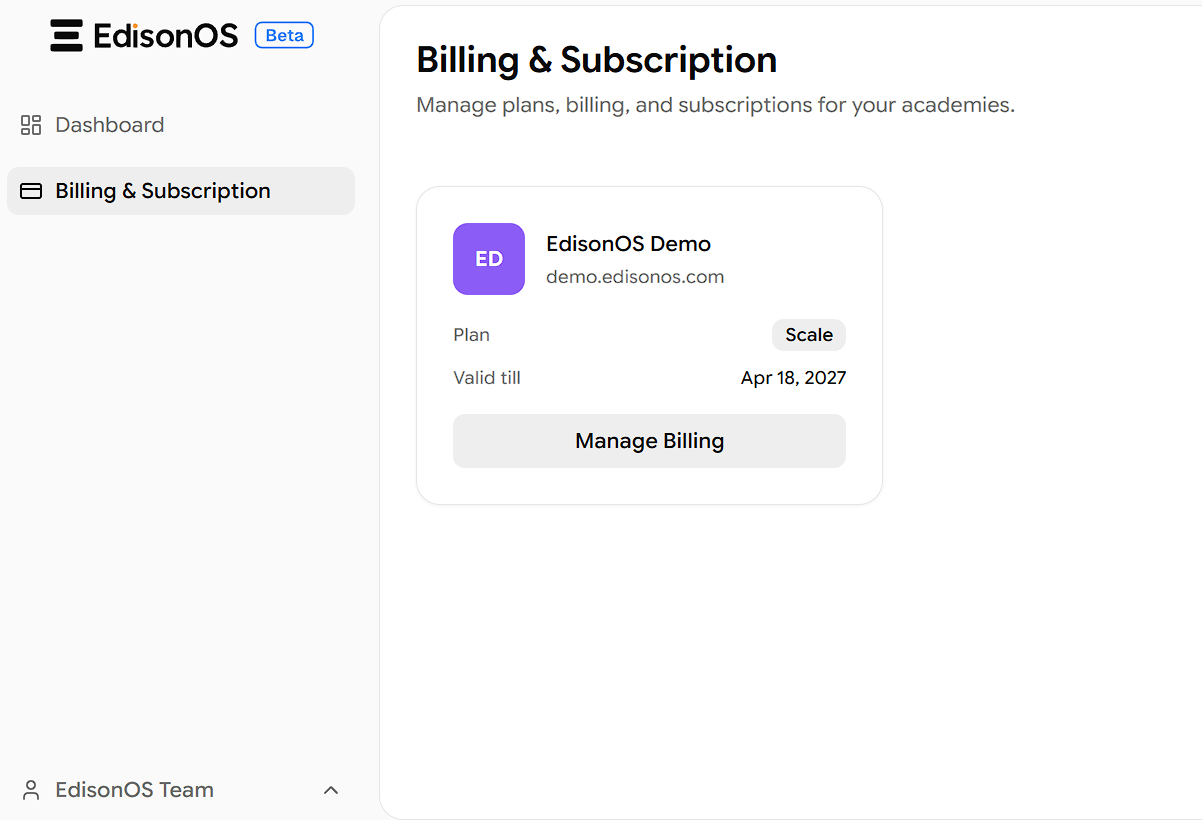
When you land on this page, you'll see a card for each academy under your account. Each card displays:
The academy name and domain.
The Plan the academy's current subscription plan (e.g., Scale).
Valid till the date the plan renews or expires.
A Manage Billing button.
Click Manage Billing on any academy card to manage the billing and subscription details for that specific academy.
Plan Details
The Plan Details tab gives you a complete overview of your current subscription plan, what's included, and your invoice history.
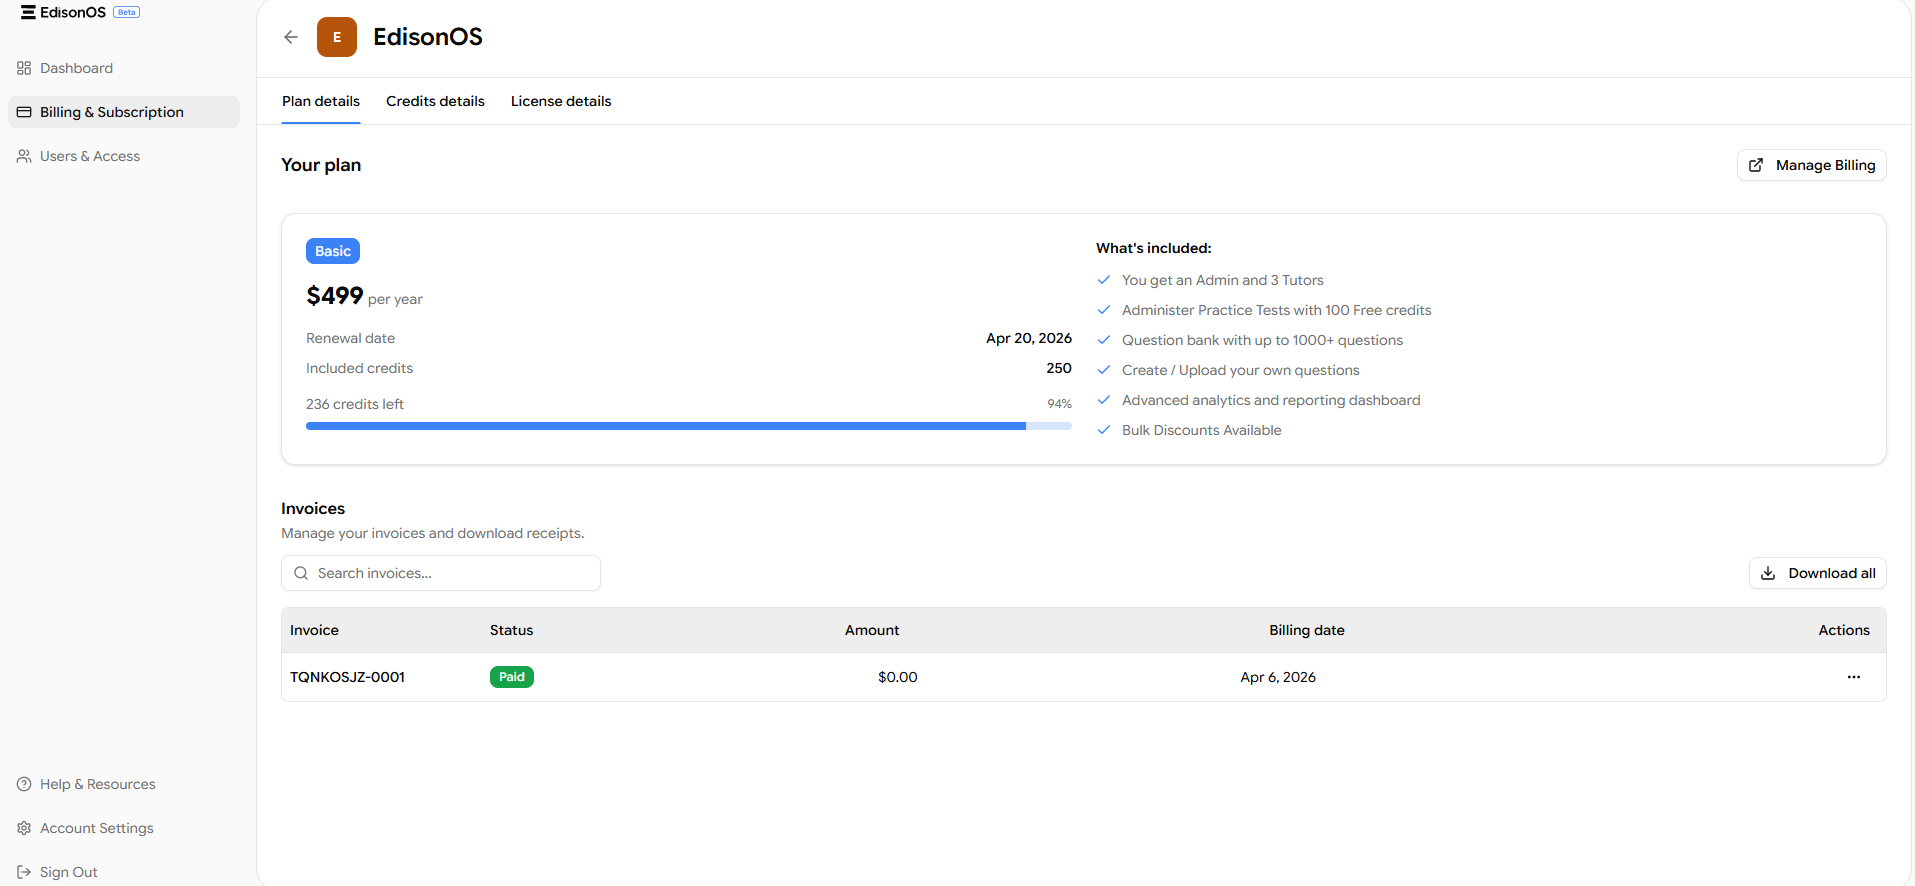
Your Plan Card includes:
The plan name and price - for example, the Basic plan is priced at $499 per year.
Your renewal date - the date your subscription is set to renew or expire.
Included credits - the number of credits bundled with your plan (e.g., 250 credits on the Basic plan).
A progress bar showing how many credits have been used versus how many remain, along with a percentage indicator.
What's Included in the Basic Plan:
1 Admin account and up to 3 Tutor accounts
100 free credits to administer practice tests
Access to a question bank with 1,000+ questions
Ability to create and upload your own custom questions
Advanced analytics and reporting dashboard
Bulk discount options available
Manage Billing: Clicking the Manage Billing button in the top-right corner takes you to a dedicated billing portal. Here you can view and update your payment method, download past invoices, and access additional options including plan cancellation if needed.
Invoices Section: Scroll down on the Plan Details tab to find your full invoice history. You can search for specific invoices by name or number, and download individual receipts or all invoices at once using the Download All button. Each row in the table shows the invoice ID, payment status (e.g., Paid), amount charged, and billing date.
Credits Details
The Credits Details tab gives you a real-time, program-level breakdown of how your credits are being consumed across your academy.
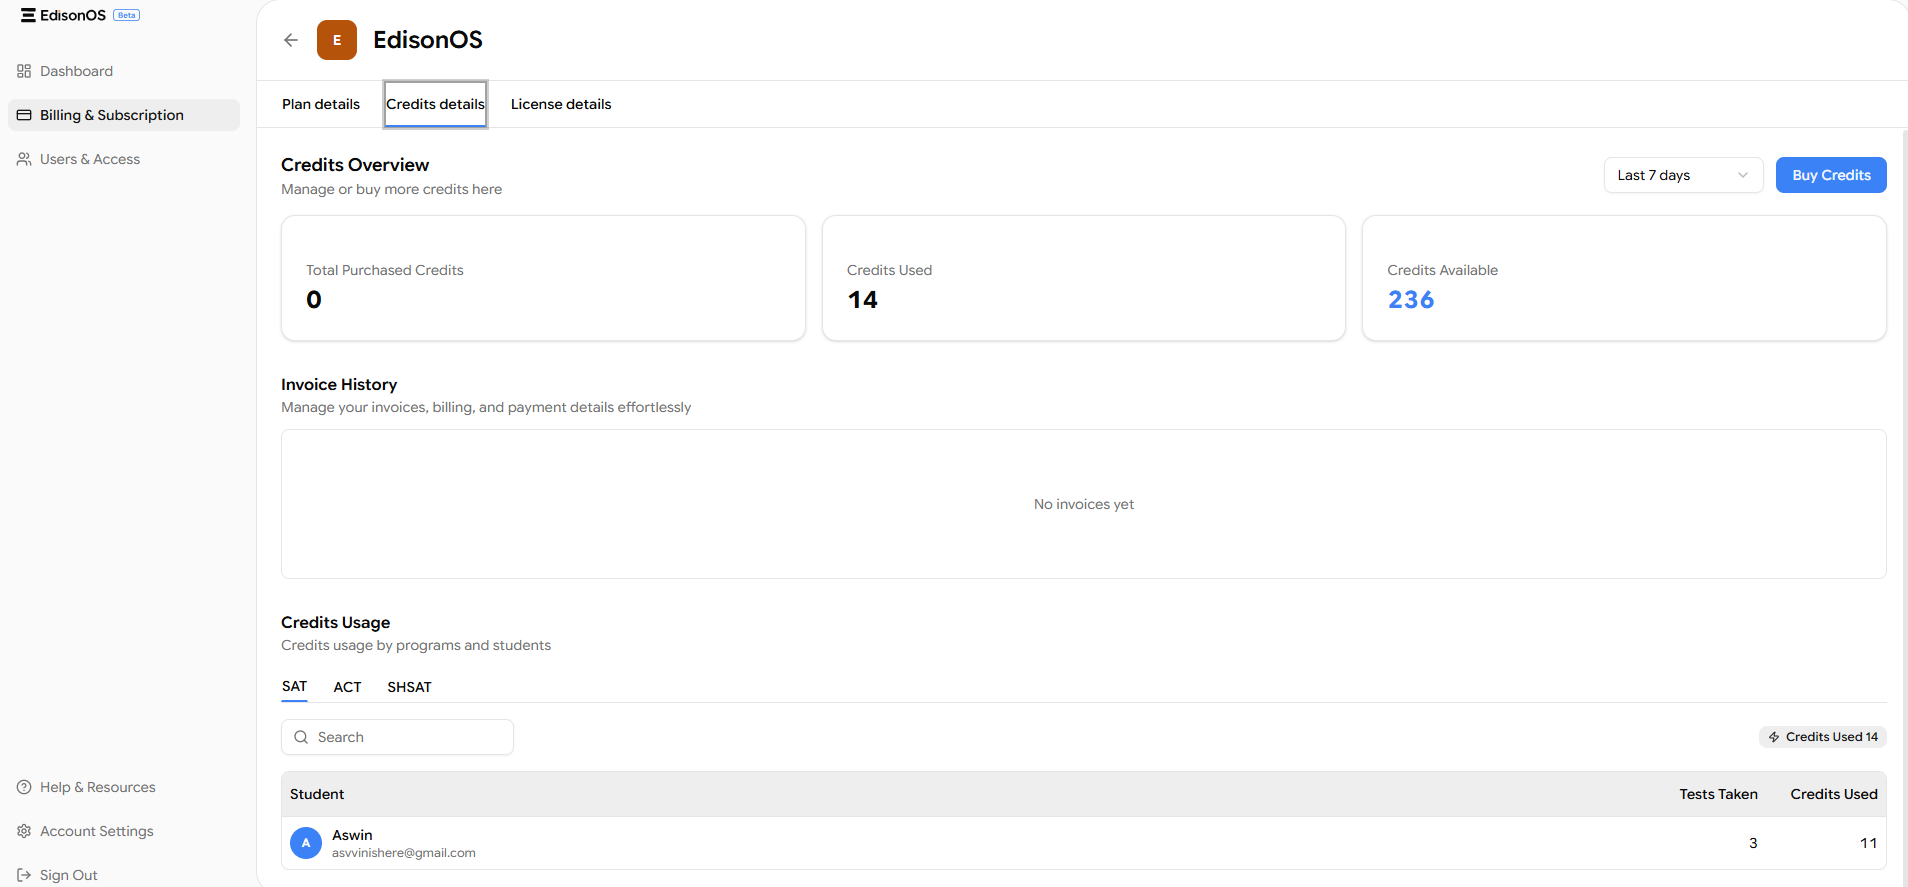
Credits Overview - Summary Cards:
At the top of this tab, you'll see three summary cards:
Card | What It Shows |
|---|---|
Total Purchased Credits | Any additional credits you have bought on top of your plan's included credits |
Credits Used | The total number of credits consumed so far across all programs and students |
Credits Available | Your remaining credit balance, shown in blue |
You can also filter the overview by time period using the dropdown on the top right (e.g., Last 7 days, Last 30 days).
Buy Credits: If you're running low, click the Buy Credits button to purchase additional credits without needing to upgrade your plan. This is especially useful mid-cycle when your included credits have been used up.
Credits Usage by Program and Student: Below the summary cards, the Credits Usage section lets you see how credits are being spent at a per-student, per-program level. Use the SAT, ACT, and SHSAT tabs to switch between programs. For each program, you'll see a table listing:
Student name and email
Number of tests taken
Number of credits used
This makes it easy to spot which students or programs are consuming the most credits, helping you plan and budget efficiently.
How Credits Are Charged Per Program
It's important to understand how credits are deducted based on the type of activity a student undertakes. Credits are not a flat rate, they vary depending on the program and whether the student is taking a full practice test, a module test, or working on problem sets.
SAT / ACT
Activity | Credits Charged |
|---|---|
1 Full Practice Test | 5 Credits |
Module Test (under Practice Tests) | 3 Credits |
Problem Set | 1 Credit |
SHSAT / PSAT
Activity | Credits Charged |
|---|---|
1 Full Practice Test | 6 Credits |
Module Test | 4 Credits |
Problem Set | 1 Credit |
Problem sets are the most credit-efficient activity, making them ideal for regular practice and homework. Full practice tests are the most comprehensive and cost more credits accordingly. Plan your assignments keeping these rates in mind to get the most out of your available credits.
License Details
The License Details tab is where you manage student licenses - an alternative access model to per-test credit consumption.
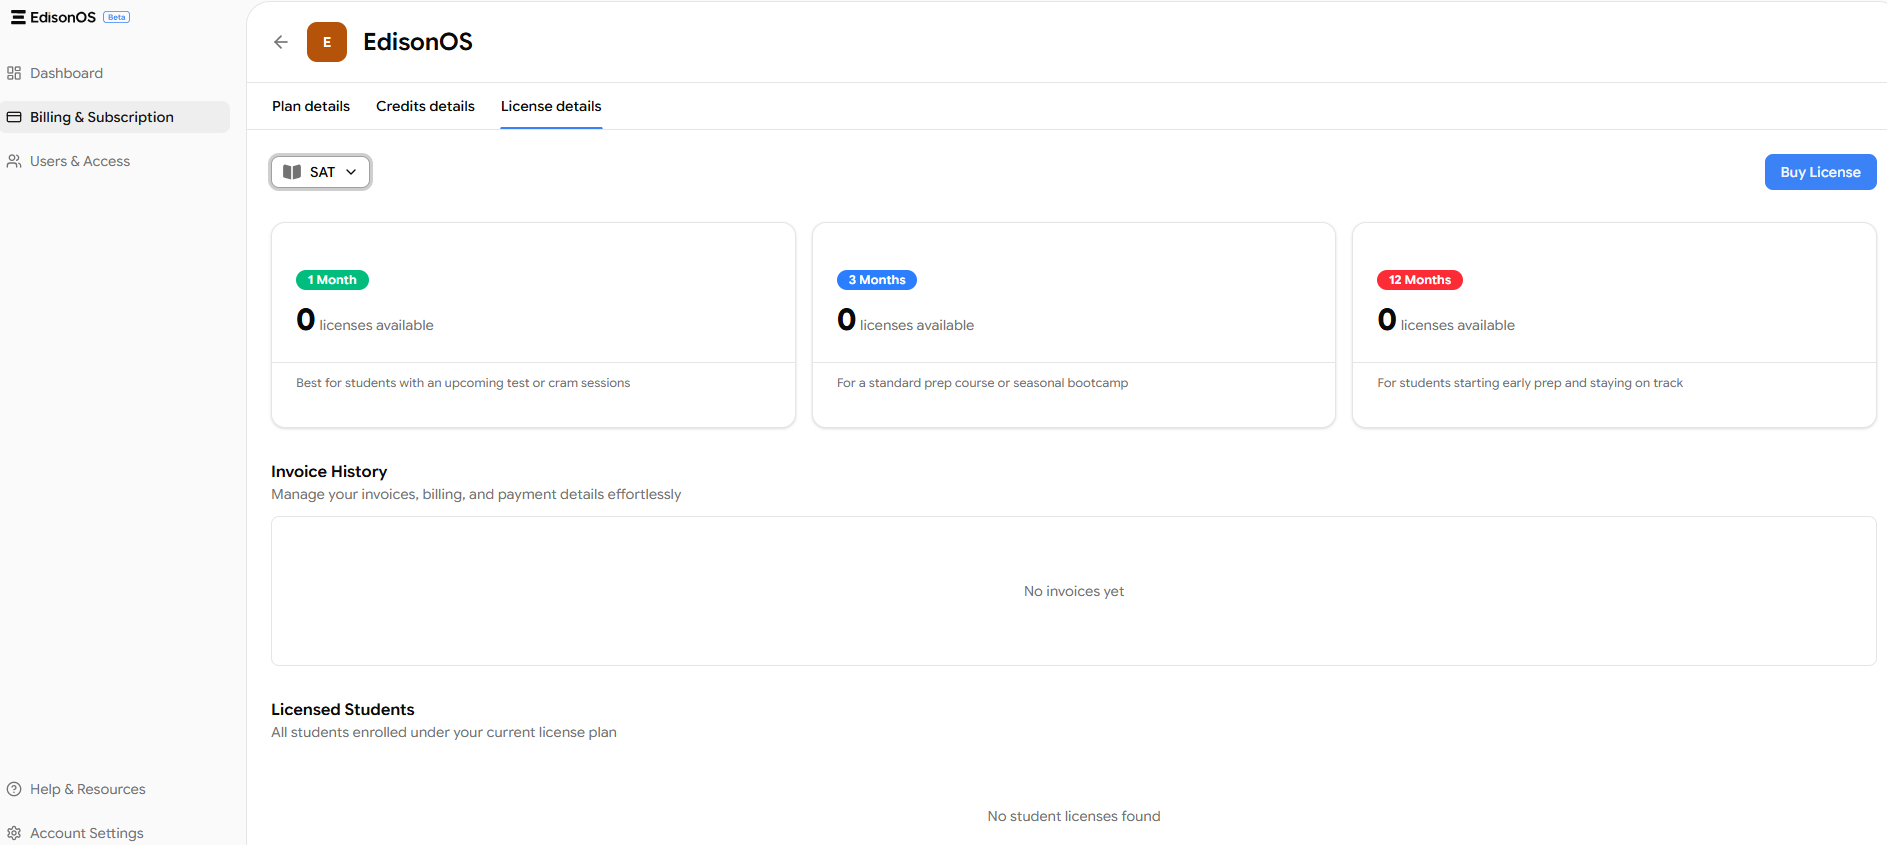
What is a Student License? A student license gives a specific student unlimited access to all practice tests, module tests, and problem sets within a specific program for the entire duration of the license without drawing from your credit balance. This is ideal when a student is in intensive prep and expected to take many tests over a fixed period.
For example, if a student holds a 3-month SAT license, they can take any number of SAT practice tests and problem sets throughout those 3 months without any credit deductions.
License Duration Options:
Duration | Best For |
|---|---|
1 Month | Students with an upcoming test date or short cram sessions |
3 Months | Standard prep courses or seasonal bootcamps |
12 Months | Students starting early prep and planning to stay on track long-term |
Program Name | 1 Month License | 3 Month License | 12 Month License |
Digital SAT | $39 / student | $79 / student | $149 / student |
Enhanced ACT | $39 / student | $79 / student | $149 / student |
SHSAT | $49 / student | $99 / student | $199 / student |
PSAT | $19 / student | $49 / student | $99 / student |
Each duration card shows how many licenses of that type are currently available in your account. When the count shows 0, you'll need to purchase more before assigning them to students.
Buying Licenses: Click the Buy License button in the top-right corner to purchase student licenses. You'll be taken to a purchase page where you select the program (e.g., SAT, ACT, SHSAT), the duration tier, and the quantity you need. Once purchased, the licenses appear in your count and can be assigned to students from within the Academy app.
Licensed Students: At the bottom of this tab, the Licensed Students section lists all students who currently have an active license assigned to them, including which plan they're on.
Summary of the Console
Console Login → Dashboard (View / Create / Edit / Delete Academies) → Billing & Subscription → Plan Details (View Plan, Credits Remaining, Manage Billing, Download Invoices) → Credits Details (Track Usage by Program & Student, Buy Credits) → License Details (View Available Licenses, Buy Licenses, View Licensed Students)